

During one of the numerous samples I made while testing the Simone Set, it occurred to me a really nice detail to add to the trousers would be to sew a permanent crease down the front legs.

A stitched crease, which is basically a pintuck, is sometimes seen on on tracksuit bottoms and often on a tailored trouser but I liked the idea of adding it to Simone. Stylewise, it’s casual and relaxed but adds a thoughtful design detail. Pictures via pinterest – links: Trouser inspiration board
While I was having a little research on the old internet I found that there are a few names trouser creases are known by;
- permanent stitched crease – a phrase which does remind me of Farah slacks from the 70s.
- my favourite term I came across was the traveller’s crease. Somehow manages to conjure up images of travelling salesmen in varying tones of brown polyester and yet, at the same time, images of glamorous starlets on epic cruises in the 1930s and 40s.
- and pintuck being the simplest term.
The stitched crease is often just on the front trouser leg, but can be added to the back leg if you want. We will be sewing our permanent crease all the way along the trouser leg but if you had a style of trouser with a dart you would finish your crease at the base of the dart and the back crease would finish at the crotch level.
According to the internet, The Crease has magical properties. The claim being that a vertical line, in theory, lengthens the leg. Hmmm. I’m a short 5’2″…I still look 5’2″ but with a sharp looking stitched crease.
Anyway, it really is quite a straight forward hack, but does require accuracy. The crease needs to be stitched before you start constructing your trouser.

| How to stitched a permanent crease |

This is the first time I’ve used a ¼ scale pattern to illustrate – how cute are tiny trousers!
TIP | If this a totally new-to-you technique remember that you can always do a few a little tests on a scrap of fabric. That is something that is part of my sewing process; testing, sampling, a practise run, are all the same thing. It can save you from disasters, sometimes you just don’t know how a fabric will behave or if you will like the result and testing can give you some extra confidence.
WST | wrong side of fabric together RSU | right side of fabric up SA | seam allowance WB | waistband casing
 PRESS |
- With WST, fold the front trouser leg in half.
- Take care to line up at the hem and the lower legs and keeping the trouser leg on grain.
- Press a crease along the entire length of the fold.
- Use steam if suitable for your cloth and a lifting up and down motion rather than dragging the iron along the fold so you don’t mis-shape or stretch your fabric.

 SEW |
SEW |
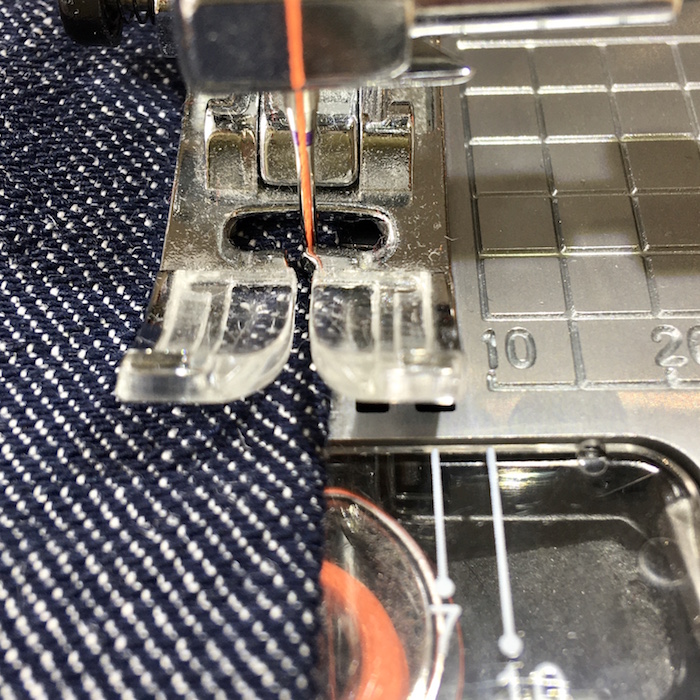
- Set your stitch length slightly longer than usual to around 3mm, a longer topstitch length will help keep your stitches neater and straighter looking.
- A matching coloured thread will be much more forgiving of any wobbles than neon orange!
- Keep the trouser leg folded with RSU and position your needle 1.5-2mm (1/16″) from the folded edge.
- Edge stitch all the way along the crease. I prefer to use my regular presser foot, but feel free to use an edgestitch foot if you have one.
- Take your time. Go slowly and steadily to ensure your stitching is a straight as possible.
- Press gently, the pintuck stands up rather than laying to either side.
- Once both legs have their stitched crease, carry on and sew your Simone trousers following the Maker Instructions.

A TINY PINTUCK VERSUS A BIG TUCK |
It’s important to sew a small pintuck. Visually it will look better but by sewing a permanent crease in the front we are actually reducing the width of the trouser and therefore the amount of ease in the width of the trouser. This means the garment measurement will be slightly smaller = the garment will be slightly tighter on the hips. It’s only a reduction of about 6-8mm in total so you won’t really notice but the bigger the pintuck the more you are reducing the trouser width by. You can see the difference in sizes in the photo above. The trouser leg at the bottom has been stitched with our small pintuck but the leg on top has been stitched using my machine foot as a guide and is stitched 7mm from the edge. You can see that’s quite the difference in width and will be doubled over 2 legs – a total of 2.8cm smaller in fact.
WAISTBAND NOTES |
It’s also worth noting that technically, your waistband pattern will now be a smidgette longer than needed as you have just removed a whisper of width from the trouser front. If your fabric has a little ‘give’ you probably won’t notice; it wasn’t an issue at all in this denim. But some fabrics are very solid and stable and can be less accommodating! If you do find your waistband casing pattern is a tiny bit bigger than your trouser body you could take a bigger seam allowance to close the waistband seam. Alternatively, ease the waistband onto the trouser body, it’s going to be elasticated so will look just fine.
 I’m really excited to see your Simone Set, don’t forget to share your makes with us on Instagram.
Tag @mavenpatterns and we will share them with all our lovely Maven Makers!
![]()
