
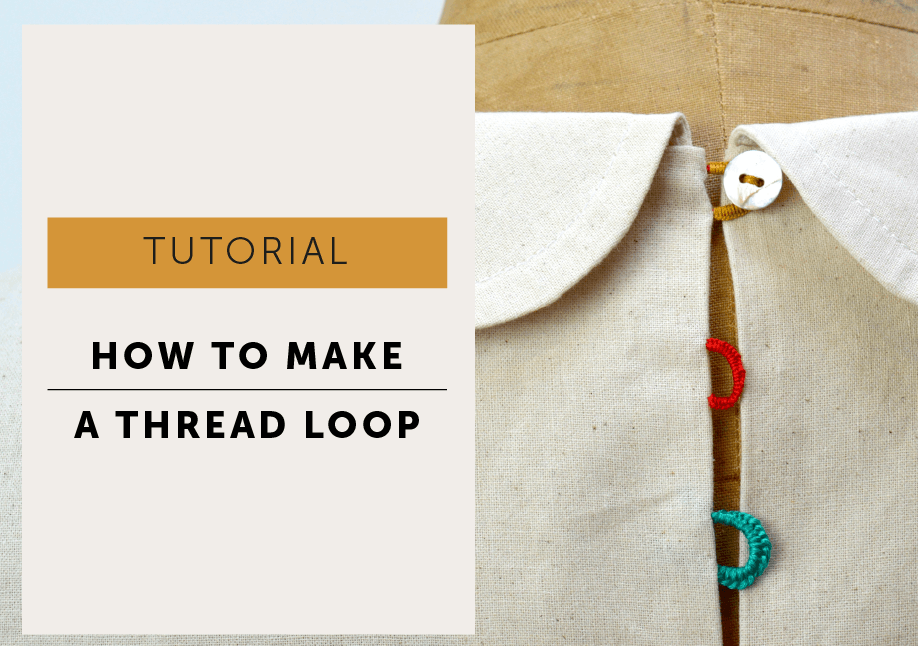
How do you make neat fabric button loops for garments and sewing projects? This tutorial shows you how to create strong, delicate button loops that work beautifully for dresses, tops and special finishing details. From turning narrow fabric tubes to sizing the loop correctly for your buttons, you’ll learn techniques that give your handmade garments a clean, professional finish.
How To Make a Thread Button Loop
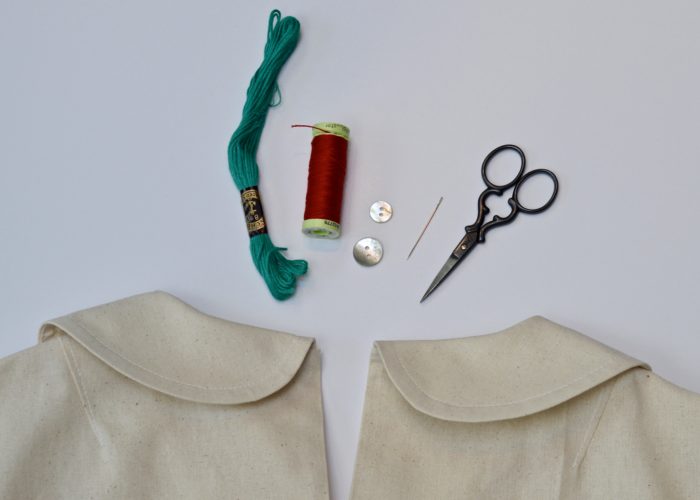
Supplies
Firstly gather your supplies:
- garment (obviously)
- button (1.5-1cm in width works well for a back neck opening), scissors, needle, beeswax (optional)
- Thread: you have to make a decision here; help is at the end of the tutorial.
- embroidery floss – great colours but makes a bulkier button loop,
- or ordinary sewing thread, will match your garment, good for garments made from delicate fabrics such as lawn. Run it through some beeswax to help strengthen it first.
- or topstitching thread – my preference, good colour selection and strong.
METHOD

Take a length of thread. I’m using topstitching thread and have threaded my needle with it doubled so I’m making 2 loops with one stitch (because I’m lazy and it’s quicker). I’m working on the WRONG SIDE of the garment and starting my loop back a few millimetres back from the edge. Bring your needle out at the point you want your loop to start.

Put your needle back into the garment where you want your loop to end, and bring it back out at the start point to form your loop.
Make your loop big enough to go over your button. It can be a little bit trial and error to get the loop the right size – it’s wise to check now that it fits!
|Tip / use your finger or a pen as a guide for consistency.


Decide how many strands you need in your loop and repeat. I’ve done 8 strands. (There is a little guide at the end) Fasten your thread off securely. With a new length of thread, bring your needle out at the base of the loop on the left. Work from the left towards the right and cover the loop with a standard blanket stitch: just put your needle through the button loop and keep your thread BEHIND your needle and pull the thread firmly. Slide the stitch along the loop so it sits to the left, right at the beginning next to the fabric.
Repeat, sliding each stitch snugly to the next, until the whole loop is covered with a closely worked blanket stitch. Secure your thread and stitch on your button.
THREAD OPTIONS

These are a few of your options regarding which thread / how many strands per button loop. There isn’t a right and wrong answer for which one to use – depends on what you’re making and what you have available!
My preference is the first one using topstitching thread / 8 strands. I actually thought it was going to be too bulky and setting back a little to the wrong side of the garment helps hide messy starts and finishes. It made a really nice sturdy loop and I do like a little bit of contrast thread, so matching thread isn’t an issue for me.
The second loop is again using topstitching thread but with only 4 strands for the loop, it’s a little floppy but perfectly serviceable. This one I set right on the folded edge of the cloth.
Number 3 is Embroidery Floss / 3 strands. Lots of choice for colours with embroidery floss but is a little bulkier in appearance. Might be nice on knitwear.(I can’t knit, so I’ve never tried that). You could also split the threads and work with fewer strands rather than the usual 8 that the floss is made of.
Number 4 is the most delicate of the button loops. Made from my usual sewing thread pulled through beeswax to strengthen. With 8 strands for the loop and the blanket stitch worked with a double thread for 2 strand coverage. This one would be lovely to use on a delicate fabric such as a cotton lawn.
I do actually really like the last one because I got to finally use my neon pink sewing thread that I bought for no other reason than the colour.
Happy Sewing! x
More to Sew …


Thank you for this tutorial! I was searching for this information for a while now 🙂 I will use it to make a new shirt with covered-up buttons. I will link to your website in my blog post about the shirt. Thank you one more time 😀
You’re very welcome!
Thank you. These are the best instructions I have found. It was so helpful that you showed pictures using various thread types. I agree the 8 strand version it the best looking. I can now make the wedding gown bustle loops I had been dreading!
Hi Anne, I’m so glad that was useful! Let me know how you get on with the gown, I will be doing my daughter’s later in the year!