
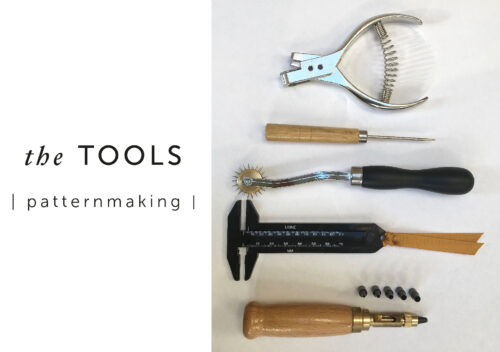

| The Maven Tool Kits |
You may have noticed that we have added some pattern cutting tools to the shop! This little foray of ours into the world of tools occurred after we held our Apron in a Day workshop and the ladies were very excited by my pattern making equipment, I’d never seen such excitement over notchers!

It’s taken us a while to find ones we were happy to share, and I wanted to get as close to my original tools as possible but some of those are over 30 years old, so I had to make suitable substitutes. But we stuck to our principles (& those of Mr William Morris) of only stocking useful or beautiful things, items I would genuinely be happy to use. My tools are still loved and well used and I’m hoping you will find that these become your treasured items.
| Notchers | 
 Notchers are a handy little plier-type tool that cuts a small little slit in the seam allowance on edge of your pattern.
A lot of commercial home dressmaker patterns have those odd little triangles that poke out to mark notches and balance marks, but that is not something we would have ever done in industry. It’s far too time-consuming to cut around those triangles and if they happened to be cut or ripped off accidentally the pattern would have potentially been useless. The small slit created by these notches is a quick, accurate and permanent way to mark the notches on either card or paper patterns. Bonus points too because if you have to flip the pattern over to cut out, the notches are still visible.
You would use these to mark all the notches (balance marks for matching, dart ends, sleeve heads, seam allowances, centre front or centre back seams) on your pattern (not your garment). Then when you have cut your garment out in fabric, just make a small snip in the ‘gap’ with your scissors to notch your garment. I always cut out the whole garment, them methodically work my way around each cut garment piece to notch. It’s obviously important to only make a small notch inside the seam allowance.
| Tracing wheel | 

I have had my original tracing wheel since I was 16 – that’s 35 years people!
I’m sure you’ve come across a tracing wheel before, but for those that haven’t it’s used to transfer markings from one layer of the pattern to another. Just run it along to leave a perforated trail, through several layers if required. It’s great to get the correct return for seam and hem allowances, the correct shape on a dart extension (see photo above) or just transferring marks. They are also very useful should you want to trace and copy a garment or detail. Use with something underneath, such as a cutting mat, to protect your work surface.

I use my tracing wheel with carbon paper to transfer all my markings onto a toile. I just slid carbon paper between the layers of calico, carbon side toward the right side of the toile with the pattern still attached and run a tracing wheel over the relevant lines. The centre front and back, bust line, waist and hips are all marked so I can check the balance of my garment when it is on the stand. Darts, pockets or pocket position are also marked in this way so I have as much information on my toile as possible, marked as accurately as possible, without necessarily needing to sew them on. Some sewers like to mark their darts etc with this method on their actual garment using dressmakers carbon, just keep in mind ours is a needle pointed tracing wheel with sharp little spikes, so check before using on delicate fabrics!
| Screw punch |

This is the one that’s confused people the most! This screw punch isn’t exactly like the one I use, I was unable to source those without having to sell them at a ridiculous price, but this one does an excellent job! It comes with different sized bits for different projects and for patterns I’ve been using the one already in the punch. Again, use with something underneath to protect your work surface.
Why do you need to make holes in your garment? You don’t you – just make a hole in the pattern to mark pocket positions, ends of darts, points you want to sew to, buttonhole placement, where ever you would normally see a black marker dot on our patterns. Once you’ve prepped your pattern it’s easy to accurately transfer your markings with chalk or a pin and, again, you can see the marking whichever side of the pattern is facing you. Interesting fact: In factories, they actually did make a hole in the garment at these points so we didn’t mark the pattern right on the end of a dart but back 1/2″ and everyone knew to sew past the mark to hide the hole.
TIP | circle each dot/hole for your size (whether you punch it or not) in a brightly coloured pen so they are easy to spot and then you won’t forget to transfer any markings to your garment.
| Awl |
A useful little pointy tool, an Awl is used to mark holes in fabric, paper or card. It’s one of those funny things – you don’t know it’s handy until you need it!
| Button gauge |
Button gauges have a special little place in my heart, my husband used to be a button seller once! In fact, the first time I met him he was making covered buttons for me.
A button gauge – it does exactly what it says and measures buttons in mm and lignes (the traditional measurement of the button).
I hope you find these tools as useful as I have.
As I said earlier, many of mine are the originals that I bought to go to college at the age of 16 and they have stayed in my tool kit because they function well and having the correct tools has made my job easier!
All our pattern making tools are available from our shop individually or as a 3 or 5 piece tool kit in a calico bag.
![]()