


I made Eve this V-neck version of The Joy dress. The brief was a shorter Joy with a V-neck and in black. Mission accomplished! The centre back length of New Joy is 69cm (27”) and we used the Mr.M’s organic black cotton poplin, which gathers beautifully for a frill!
You may have met Eve at one of the shows, she’s our eldest daughter and head of the studio here. I actually made this last summer (you know me, never like to rush into anything, the Queen of procrasination), anyway I thought now would be a good time to share how I did it as the UK is having a heatwave and I’ve actually taken my cardi off!
This is a good little tutorial to have in your sewing kit and not just suitable for The Joy Dress as this is a good way of stitching any V-neckline finished with a facing.
I changed the front neckline but there’s no reason why you couldn’t add a sassy little V in the back too!
For the purposes of this tutorial I’ve just made a sample of the neckline to show the process of how to sew a v-neck, I haven’t made the bust darts so the neckline lays flat in a photo but you should follow the Joy Maker instructions and pop over here for the neckline sewing bit.
How To sew the perfect V-neckline.
The Pattern
First, you’ll need to alter the pattern. As always when altering a pattern trace off a copy so your original stays intact (if you have the PDF version you can always print another). You will only need to trace the front body and the front facing.

On the pattern draw in the SA (seam allowances) I’ve marked the original ones in red.
Decide how low you’d like your V to finish and mark on the pattern. I lowered Joy 4cm (marked on my pattern with the arrow).
Redraw your new neckline, my new lines are in green. I used part of the original neckline and used a slightly curved line to join to the lowered point.
You could draw a perfectly straight line if you wanted to but, and it is a personal choice, I always feel that a V-neck with a slight curve to it looks nicer and less harsh.
Add the 1cm SA( ⅜”) on and cut away the excess pattern.

Repeat for the facing. Just lay the facing and body pattern together, aligned at the top and Centre Front, and trace your new neck shape. You may know that facings should be a slightly different shape to the main body to allow for ‘turn of cloth’ but in this case, because of the straps, we are going to ignore that and keep them the exactly same neckline shape.
The Interfacing

Follow the Joy instructions (steps 1 and 2) and apply fusible stay tape to the wrong side the body at neckline and armhole. I haven’t added any to the facing but if you have a soft or drapey fabric that you would like to give a little more support to, apply interfacing tape to both the body and the facing.
Sew!
Follow the Joy instructions until you get to step 19.
At this stage you will have the straps in place. The body and facing are made and placed with right side together, and stitched together across the back and around armhole with just the neckline left to stitch.
Tips for sewing a V-neckline
Make life easier and mark in the SA with a suitable fabric marker – i.e. one that is not going to leave a permanent mark!
Nothing looks worse than an off centre V (that’s probably an exageration, but you know what I mean). I’ve marked the Centre Front line on the facing just so you can see it, you may want to mark yours.
Stitch with care so you don’t stretch the neckline.
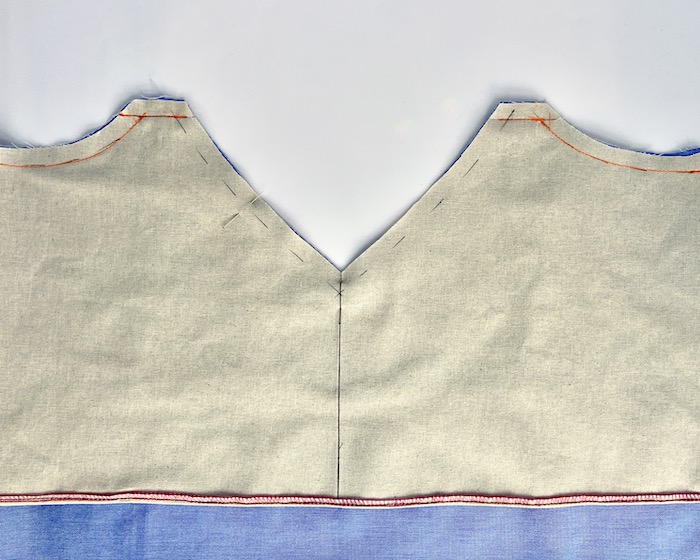
Here’s the clever trick with stitching a ‘V’.

Using 1cm S/A( ⅜”), start at the strap and stitch towards the point. Start with your normal stitch length, and about 3cm (1½”) up from base of “V” change to a smaller stitch length.
At the ‘V’ base, rather than stitching to a point, pivot (by keeping your needle in the fabric) and stitch HORIZONTALLY across one stitch and then pivot again to continue stitching back up the other side of the neckline.
Stitch for about 3cm (1½”) with the smaller stitch length and then change back to a normal stitch length. Press the stitchline.

Snip very carefully into the SA at base of the ‘V’, right up to but not through the stitch line. It won’t turn cleanly to the right side if you don’t clip in far enough but it will fray if you cut too far!.
Trim the excess SA to 6mm (¼”) so it will turn to the right side cleanly. I rarely use the ‘clipping’ seam allowance method, trimming the SA down to 6mm gives a much smoother curve and is quicker!

Turn to the right side and understitch. Press gently with the seam rolled to inside of garment so not visible on the right side.

There go … the perfect V neck!