Posted on

The BIG BIAS BINDING TUTORIAL

Learn how to sew Bias Binding with our bias binding tutorial!

I’m working on producing a library of sewing tutorials for Maven Patterns.

They will all be here in one place, updated to keep relevant with each new pattern release and covering every technique on a pattern by pattern basis.

That way you can look up new stuff if you want to, do your own thing, or do what I do…look it up and then do my own thing anyway, because there is always more than one good way to sew anything 😉

It will also help to keep the Maker Instructions with each pattern concise, clear and relevant. You only need to learn how to do binding once, what you don’t need is a massive pattern file on your computer taking up space!

So in support of my next pattern, here is a lovely big binding tutorial! (If you just want to know How to Sew your binding CLICK  HERE for the condensed tutorial.)


The Big Bias Binding Tutorial

How to cut, make, join & stitch bias binding

Bias binding is a great way to finish the raw edge of a garment. It is hugely versatile and can be used on necklines, armholes, hems, pretty much anywhere really. You can buy ready made binding from your local haberdashery shop or make your own and use up some of those scraps!

There are really two types of binding for our purposes:

DOUBLE BIAS BINDING is on show from the right side of the garment and can be decorative if made in a contrasting fabric.

SINGLE BIAS BINDING: It can be used in lieu of a facing on an armhole or neckline, and apart from a row of topstitching, only be seen on the inside.

Prepare the Binding

If you are using a Maven Pattern, I always include a pattern piece for each bias strip needed so just use that and be sure to follow the grainline as it must be cut on the BIAS GRAIN of your fabric.

How to cut your own bias binding

Your strips need to be cut on the bias grain of your cloth, so they will stretch around curves (armholes, necklines etc) and lay flat once stitched.

(There are times to use binding cut on the straight grain, usually for the edges of quilts, but if in doubt cut on the bias.)

TIP: If my fabric is a little unstable I’ll either tape it to the table to stop it moving, or pin the fabric to paper, at the marking stage before cutting the strips.

First you will need to find the TRUE BIAS (often just referred to as the bias grain) of the fabric. The bias of the fabric runs at a 45 degree angle to the lengthwise grain (along the selvedge) and the crosswise grain (the width of the cloth).

MAVEN PATTERNS BINDING TUTORIAL- how to layout fabric ready to cut bias binding

To find the true bias: square off one end of your fabric. Fold the fabric diagonally so the crosswise grain is parallel to the selvedge/lengthwise grain (forming a triangle shape as above). Press the fabric along this fold to mark the bias grain.

MAVEN PATTERNS BINDING TUTORIAL - cut out your binding on the bias grain of the fabric

Open the fabric out and using your pressed line as a guide, mark out your bias strips to your desired width, keeping them parallel to your fold line.

Your strips need to be 4 times your finished width, I usually find cutting 4cm wide for a finished binding of 1cm works well. Cut as many bias strips as you need to complete your project. You can mark with a fabric marker pen, but if you are careful and mark on the reverse of your cloth, I’ve found a pencil or ballpoint pen works well as they give an accurate line and you don’t lose your marks too quickly. But do make sure you do a test first!

Join

To join to ends of binding together (or separate pieces if you need a long continuous strip)

Lay your binding strips on top of each other with Right sides together and at 90 degree angle to each other.

Stitch across the diagonal to join as shown in the picture.

Trim away the excess to leave a 6mm seam allowance and press this seam open.

join and sew a loop of bias binding, Maven Patterns Bias tutorial

To finish the sleeve hem on The French Dart Shift Dress, or to bind an armhole, you will need to make a loop of binding as above.

I like to join first and then press my bias strip into binding. I use a sleeve board at the pressing stage to help so it’s not too fiddly. That is just a preference, you may find it easier to fold press your binding first and if you are using a BIAS TAPE MAKER TOOL you will need to make your binding and then join it.

Alternate joining/ finishing method

This is an easy way to join your bias binding, especially if you are not sure of your finished measurement so can’t pre join together before stitching to your garment….

joining bias binding method BINDING TUTORIAL

Fold back starting edge by 1cm to wrong side of binding and then pin binding into place aligning the raw edges of garment with the raw edge of the binding and with right sides facing together.

joining bias binding together BINDING TUTORIAL


Continue to pin binding along edge of garment, and then at the join lay the binding directly on top of your starting point and trim so that it overlaps by 1cm.

Stitch into place and finish as described in the ” How to sew bias binding instructions below”

how to overlap bias binding, BINDING TUTORIAL

You will create a neat little overlapping finish. It is suitable for many fabrics but you may find this method a little bulky for thicker ones – then it is preferable to use the diagonal stitch method discussed above.

How To Sew Double Bias Binding
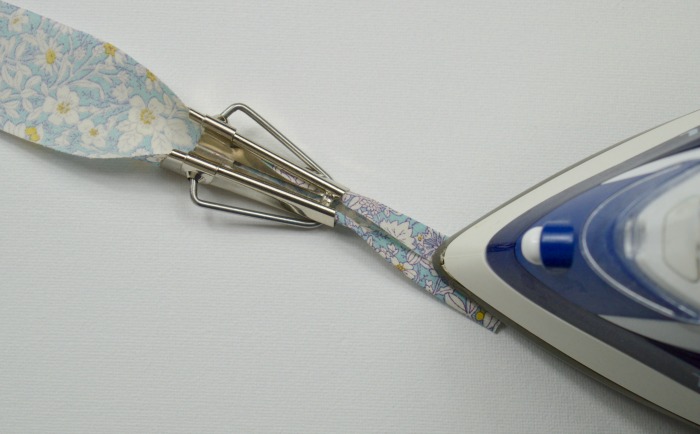
Press

Now you’ve cut your binding and if necessary joined your binding, it’s time to press your strips so they look like binding…

press your bias binding in half ,Maven Patterns Bias tutorial


Take your length of binding, fold in half and press. Unfold and refold each outside edge to meet your centre fold and press.

Fold it all back together and press flat firmly but don’t stretch it.

Alternatively use the handy BIAS TAPE MAKER gadget…

bias binding tool maker and iron image

The handy little gadget that is the bias making tool can be incredibly useful, especially if you are making a lot of binding. Just pull your pre-cut binding through the tool and it will fold it ready for you to press into perfect binding. They come in different sizes, so you can just pick the one that will give you the width you want.

If you google how to sew binding you get 833,000 results…this is my way…feel free to tweak and find what works best for you!

Maven Patterns Bias binding tutorial, attaching the bias tape to your garment

Take your prepared binding and pin RIGHT side of binding to the RIGHT side of garment aligning the raw edges together. Machine stitch along the fold.

TIP: if you are binding a thicker fabric or a few layers of fabric, take a smaller seam allowance so you have extra binding where you need it to help accommodate that extra bulkiness.

Maven Patterns Bias binding tutorial - fold your bias tape to the wrong side

Press binding AWAY from the garment.

Maven Patterns Bias binding tutorial tack or basting your bias in place

Wrap binding over to the raw edge to WRONG side of garment, and position the folded edge of binding so your machine stitching is covered by a few millimetres. Pin to hold. Tack right on the edge of the binding to hold into place – ensure you catch all the binding on the reverse side and just cover the machine stitch while keeping an even distance away from the binding on the front. Take your time to get this right now, the tack line will be a guide to your topstitching!

Maven Patterns Bias binding tutorial close up of bias binding

Two options to finish

OPTION 1: EDGE STITCH ON THE BINDING

Maven Patterns Bias binding tutorial edgestitching bias binding in place
Maven Patterns Bias binding tutorial, how bias binding looks on the reverse or wrong side of a garment

Top stitch the binding to finish: with the right side of your garment facing you, edge stitch on the binding and as long as you stitch to the inside of your tacking stitch and you know you’ve caught the back of the binding!

OPTION 2: STITCH IN THE DITCH

If you don’t want your stitching to show on your binding try this method…finish your binding by stitching in the ditch (also known as sink stitch).

‘Stitch in the ditch’ is a really useful technique to know, good for finishing waistbands as well as bindings and also the neckline of The French Dart Shift (coming soon!). When stitched in the same colour as your main fabric the stitch line practically disappears as it settles into the seam.

Maven Patterns Bias binding tutorial 11 - stitch in the ditch
Maven Patterns Bias binding tutorial a raw edge finished with bias tape


Position your machine needle in line with the groove (the ditch) of the seam, you are going to stitch right in that ditch, NEXT to the binding but not on it. And as long as you stitch to the inside of your tacking thread, you know you’ve caught your binding on the back 🙂

Just remove your tacking thread, and you’re done!

And another way to attach binding

an alternative way to finish a raw edge

There is yet another way to attach bias binding to finish a raw edge! This way was shared with me by Shelley, one of my lovely testers of the new Maven1832 patterns. Shelley was making the French dart with the bishop sleeve in a slippery fabric and found this was an easier way to attach the binding at the cuff.

It’s pretty similar to the above methods, except you attach to the wrong side of the fabric and flip binding to the right side of the fabric and stitch. This method only works with visible edgestitching but you might find it less fiddly if you are working with a tricky or slippery fabric.

It’s really a personal preference which way you prefer to sew your binding, but it’s always good to have more than one way to stitch something. Different fabrics do sometimes require a different method!

METHOD

Place the right side of binding to the wrong side of fabric and stitch in the fold to attach.

Fold binding over to the Right Side so all the raw edges are enclosed and the stitch line is covered. You can trim the seam allowance down a smidge if the biding doesn’t quite cover the stitch line.

And then, with the Right Side Up facing up, edgestitch the binding in place.

How to Sew Single Bias Binding

This isn’t everybody’s method. This is the method I was taught by a sample machinist I worked with about 20 years ago, she called it the Cheat Method.

It’s a really nice way to finish a raw edge on a neckline or armhole without using a facing.

MAVEN PATTERNS SINGLE BINDING TUTORIAL 01

PRESS: Just fold your binding in half and press.

how to attach single bias binding as a facing
stitching bias binding or bias tape into place

ATTACH: Line up the raw edges of your binding with the raw edge of your garment, with right sides together.

Stitch with seam allowance to attach.

press the bias binding flat
baste the bias tape to the garment

Press binding and seam allowances away from garment. Understitch (machine stitch an edge stitch through all the layers on the binding close to the seam.) The understitching is an optional step, there won’t be a disaster without it, but it does make the binding roll to the wrong side better and I think it makes the binding stronger.
Tack along the edge of the binding to hold in place, this will also give you a guide line for your next row of stitching.

MAVEN PATTERNS SINGLE BINDING- stitch the bias tape in place

Flip your garment over and topstitch with the right side up. If you stitch inside your tacking line so you know that you will catch all the binding!

(You can make narrower binding if you prefer…simple bit of maths… finished width of binding + seam allowance, x 2 = cutting width of binding.)

I liked the method because it was quick and that binding NEVER frayed no matter how much I washed those garments (kids clothes), must have been the combination of a folded edge and the extra understitching – great for linen fabrics.  I’ve used this many times over the years instead of a having a flappy facing. The only drawback is some fabrics are just too bulky, but just bind anything too thick with a contrasting fabric and make a feature of the inside!

Posted on 1 Comment

How to Measure a Curve on a Sewing Pattern

Learn How to measure the curve of a sewing Pattern with this free sewing tutorial

Now, this might seem a little obvious to everyone, I’ve hesitated even posting and calling it a tutorial. But following conversations with my youngest daughter (15, studying textiles at school) and a friend of mine (long time sew-er), neither of them knew this shortcut – and to be honest I only discovered it when I was working after 4 years of studying fashion! It’s the easiest and most straightforward way I know to measure necklines, measure a sleeve head, armholes (or the armsyce if you want the industry term – I’m popping it in here for the benefit of Sir Google).

So on the off chance that someone, somewhere, needs to quickly measure the curve on a sewing pattern …

HOW TO MEASURE A CURVE

There are various gadgets and measurement tools around to measure curves on sewing patterns – flexible rulers and wheely things, and if they work for you, excellent! The great thing about sewing is there is always more than one way to solve a problem.

But, you see I’m not a great one for gadgets, so for this method, you’ll only need the basic pattern making tools – a tape measure, a pencil and a ruler.

Why would I need to measure a curve on a sewing pattern?

If you need to alter a pattern to fit you, you may find you need to adjust the armhole or neckline and then you are going to need to make sure the collar or sleeve fits again. For that, some pretty accurate measuring will be needed!

Here’s the method, I’m going to pretend you’re measuring an armhole.

How to measure a curve tutorial: Maven Patterns

Step 1:  

Before you measure the curve, you will need to use your ruler and mark the correct seam allowance accurately on your paper pattern in pencil. This represents your stitch line when you stitch your garment together. It’s this line, not the outside edge of your pattern that needs to be the same measurement.

How to measure a curve tutorial: Maven Patterns

You don’t need any Fancy Curve Measurement Tools …

Step 2:

Next grab your tape measure. Here’s the trick. Stand it up on its SIDE and walk it EXACTLY along your pencil line to measure that entire length of armhole – EASY! Make a note of the measurement, I always write them straight on the pattern piece.

  • Now use the same method to measure the curve of your sleeve head. Remember it will be bigger than the armhole as it should have some ease in it.
  • You can see here that I don’t include the side seam allowances when I measure. As a general rule when measuring your pattern the trick is to just be consistent. It’s really easy to get confused and include the seam allowance in the armhole and then not on the sleeve head or sleeve cap. And then it takes a while to work out why the pattern pieces don’t fit together!
  • When I’m measuring a sleeve head to check it fits into the armhole I don’t measure the whole sleeve head in one go.
  • I’ll either measure from the underarm seam to the top of the sleeve head, where it would align with the shoulder seam. And then the other half of the sleeve head.
  • Or if I want to check the position of the notches I’ll draw a line from each notch to intersect the seam line. Then I’ll actually measure in-between each notch so I can check the notches are all in the right place and will match up at the same time as checking the sleeve will fit.

That’s it! It can take a little practice to do it accurately, but who doesn’t love a low (no!) tech solution to a problem?

Happy stitching and curve measuring,

Mrs M x

Posted on

How To Sew The Perfect V-neck

I made Eve this V-neck version of The Joy dress. The brief was a shorter Joy with a V-neck and in black. Mission accomplished!  The centre back length of New Joy is 69cm (27”) and we used the Mr.M’s organic black cotton poplin, which gathers beautifully for a frill!

You may have met Eve at one of the shows, she’s our eldest daughter and head of the studio here. I actually made this last summer (you know me, never like to rush into anything, the Queen of procrasination), anyway I thought now would be a good time to share how I did it as the UK is having a heatwave and I’ve actually taken my cardi off!

This is a good little tutorial to have in your sewing kit and not just suitable for The Joy Dress as this is a good way of stitching any V-neckline finished with a facing.

I changed the front neckline but there’s no reason why you couldn’t add a sassy little V in the back too! 

For the purposes of this tutorial I’ve just made a sample of the neckline to show the process of how to sew a v-neck, I haven’t made the bust darts so the neckline lays flat in a photo but you should follow the Joy Maker instructions and pop over here for the neckline sewing bit.

How To sew the perfect V-neckline.

The Pattern

First, you’ll need to alter the pattern. As always when altering a pattern trace off a copy so your original stays intact (if you have the PDF version you can always print another). You will only need to trace the front body and the front facing.


On the pattern draw in the SA (seam allowances) I’ve marked the original ones in red. 

Decide how low you’d like your V to finish and mark on the pattern. I lowered Joy 4cm (marked on my pattern with the arrow).

Redraw your new neckline, my new lines are in green. I used part of the original neckline and used a slightly curved line to join to the lowered point. 

You could draw a perfectly straight line if you wanted to but, and it is a personal choice, I always feel that a V-neck with a slight curve to it looks nicer and less harsh.

Add the 1cm SA( ⅜”) on and cut away the excess pattern.

Repeat for the facing. Just lay the facing and body pattern together, aligned at the top and Centre Front, and trace your new neck shape. You may know that facings should be a slightly different shape to the main body to allow for ‘turn of cloth’ but in this case, because of the straps, we are going to ignore that and keep them the exactly same neckline shape.

The Interfacing

Follow the Joy instructions (steps 1 and 2) and apply fusible stay tape to the wrong side the body at neckline and armhole. I haven’t added any to the facing but if you have a soft or drapey fabric that you would like to give a little more support to, apply interfacing tape to both the body and the facing. 

Sew!

Follow the Joy instructions until you get to step 19. 

At this stage you will have the straps in place. The body and facing are made and placed with right side together, and stitched together across the back and around armhole with just the neckline left to stitch.

Tips for sewing a V-neckline

Make life easier and mark in the SA with a suitable fabric marker – i.e. one that is not going to leave a permanent mark! 

Nothing looks worse than an off centre V (that’s probably an exageration, but you know what I mean). I’ve marked the Centre Front line on the facing just so you can see it, you may want to mark yours.

Stitch with care so you don’t stretch the neckline.

Here’s the clever trick with stitching a ‘V’. 

Using 1cm S/A( ⅜”), start at the strap and stitch towards the point. Start with your normal stitch length, and about 3cm (1½”) up from base of “V” change to a smaller stitch length.

At the ‘V’ base, rather than stitching to a point, pivot (by keeping your needle in the fabric) and stitch HORIZONTALLY across one stitch and then pivot again to continue stitching back up the other side of the neckline.

Stitch for about 3cm (1½”) with the smaller stitch length and then change back to a normal stitch length. Press the stitchline.

Snip very carefully into the SA at base of the ‘V’, right up to but not through the stitch line. It won’t turn cleanly to the right side if you don’t clip in far enough but it will fray if you cut too far!.

Trim the excess SA to 6mm (¼”) so it will turn to the right side cleanly. I rarely use the ‘clipping’ seam allowance method, trimming the SA down to 6mm gives a much smoother curve and is quicker!

Turn to the right side and understitch. Press gently with the seam rolled to inside of garment so not visible on the right side.

There go … the perfect V neck!

Posted on 2 Comments

The Rochester – FBA tutorial

The Rochester sewing pattern has no bust dart and a gathered neck, so how does one go about doing a full bust adjustment (FBA for short) to add a little more room where one may, ahem, require it??MAVEN PATTERNS_THE ROCHESTER_DRESS_FBA_full bust adjustment

It’s not that tricky, just slash and spread! I’ve got 2 methods for you to try, the first is shows how to add extra without adding a bust dart. The second method is pretty much a standard FBA and adds a bust dart at the side seam. You may find the dart helps to give a nicer fit if you have a bigger bust and need to do a very large FBA.

*As this is our 3rd FBA tutorial you may know already know the theory and how much to add for your FBA. If so, scroll on down to the Method and miss out the next bit which is the same as the FRENCH DART FBA tutorial!

What is a Full Bust Adjustment (FBA)?

Sewing patterns are generally (and there are exceptions) drafted to accommodate a B cup. All Maven Patterns are drafted with a B cup. Unfair I know, but unfortunately, it’s just not possible for us to produce a pattern that will keep all body shapes happy, as we are all unique and the variations are limitless!

So, great if you are a B cup, but not so much if you are bigger (or smaller). In which case you might need to do a Full Bust Adjustment – FBA (or a Small Bust Adjustment – SBA). An FBA is a pattern alteration that will put a little more room in the bust area to accommodate a fuller bust should you need it, and if we are going to go to the trouble of making our clothes, might as well make them fit as well as we can!

Can’t I just go up a size?

You can, but the pattern will then most likely be too big across your shoulders and your back. What you need is more width and length in your pattern at the right place – to go over and around a fuller cup. The idea of the FBA is to do this without messing about with your armhole and sleeve and keeping a great fit in the shoulder.

How do you know if you need a full bust adjustment?

Your toile may be gaping at the armhole, will have drag lines pointing to the bust, and probably looks a bit ‘strained’ over the bust, your boobage just looks a little squashed in there!

Small Bust Adjustment side note: A SBA is basically the same process, but involves overlapping the pattern to reduce instead of spreading the pattern to increase the bust cup size. If you need a Small Bust Adjustment, there will be too much fabric over the bust area, and your bodice will be too long at the centre front.Abbreviations |

FBA | full bust adjustment         SBA | small bust adjustment      CF | centre front          BP | bust point/apex

Equipment |

  • Copy of pattern (or the ability to re-print)
  • Ruler
  • Pencil
  • Sticky tape
  • Tape measure
  • Paper scissors
  • Pattern paper

Which cup size are you?

Measure yourself while wearing the appropriate underwear. If you are going to wear a padded bra under your dress, go put one on first – it will make a difference to the fit.

Importantly, your cup size for a sewing pattern is not the same as your bra cup size. (I’m a B for a pattern, and wear a D bra)

  • Measure your HIGH bust across your back, under your armpits and above your bust.
  • Then measure your FULL bust, at the fullest part of your bust.
  • Note these measurements and the difference between them.
  • Difference of 1”  (2.5cm) = A cup (SBA)
  • Difference of 2″ (5cm) = B cup
  • Difference of  3” (6.5cm) = C cup (FBA)
  • Difference of 4” (10cm) = D cup  (FBA)
  • Difference of 5” (12.5cm) = DD cup (FBA)

Pick your size |

If you are above a B cup you’ll probably need to do an FBA and should select your size by using your HIGH bust measurement in place of your FULL bust measurement.

This is the most common and popular method, by far, because it will give a better fit in the shoulders and neck area, then you just do a Full Bust Adjustment and alter for a fuller bust. If, on the size chart, you have a size 16 full bust, but a high bust measurement of a size 12, chances are the shoulders of a size 16 pattern will be completely out of proportion for you! You may still need to adjust or blend between sizes for hips and waist.How much to add?

It’s a bit of chicken and egg situation. There is not one way to do this alteration (or any alteration). It can be a little test and see, and a lot of getting to know your OWN body and how you like a garment to fit on you. Take these measurements as a guide. If you start googling this, you’ll find a lot of different advice and it’s not that any of it will be wrong – just different ways work for different bodies, garments and preferences. You just have to start somewhere to find what works for you! You’ll need to toile and test and tweak your alteration, maybe more than once. A toile is going to be your best friend – the fabric doesn’t lie! Also, consider the look of the garment, a looser fitting garment might not need as much adding as a very fitted garment. Or you might just decide you want more/less ease and adjust your FBA accordingly.

I’ve got 2 options listed below: Either toile and slash open to give an idea, or a bit of Maths. It is very much trial and error the first couple of times until you know what works for you.

TOILE: Make a quick toile (just the body, don’t bother with sleeves, collar etc). Try it on and mark your bust point. Cut a cross in the fabric at your Bust Point / Apex, let it spread open and then measure how much extra you need. (For a SBA, instead of slashing, pin the excess out of the bust)

I like this slash and spread and see-what-you-need method. Pay attention to the neck and shoulders of your toile, and see if they fit or if a size smaller/bigger would look better on you.

MATHS OPTION: Take your FULL bust measurement and minus your HIGH bust measurement = TOTAL FBAamount to add. DIVIDE TOTAL by 2 = the actual amount to be added to pattern (Remember when you are adjusting the pattern you are working with HALF a body front so you’ll need to divide the total amount of extra needed by 2 before adding to your pattern).

METHOD |Full Bust Adjustment 

FBA | Without a bust dart  

This method is taken from Fast Fit and Sewing Patterns , combined with a bit of ‘Y’ dart method from Fit for Real People.

  • Find the Bust Point (also called the APEX) | The Bust Point (BP) or Apex is already marked on The Rochester pattern for you so it’s very easy to find (you’re welcome!). Mark your BP on the pattern and compare with the BP that has been pre-marked on the pattern. If there is a lot of difference, use your BP for the alteration as you want the extra to sit in the right area for your bust. (How to find your BP – Lower a bust dart tutorial)

Draw the Lines | 

  • Using a copy of your front pattern, mark the seam allowances so you know where the stitch line is.
  • LINE 1: Draw a line from the BUST POINT (BP) right down to the hem, parallel with the CENTRE FRONT LINE. Draw a line from the BP to a point about a ⅓ of the way along the armhole.
  • LINE 2: Draw a line from the BP to the centre of the shoulder.
  • LINE 3: Draw a line from the BP to the midpoint of the neckline.
  • LINES 4 & 5: Draw 2 lines from armhole to line 2 spread evenly between the shoulder and line 1.

Cut the Lines | 

  • Cut along LINE 1. Start at the hem and cut to the BP and then to the armhole. Cut UP TO stitch line but NOT through it. Cut from OUTSIDE of the pattern up to the same point on the armhole stitch line, leaving a 3mm hinge of paper.
  • *If you hinge your armhole from the outside edge of the pattern instead of the stitch line, your armhole increases in length and then your sleeve won’t fit.
  •  Cut along LINE 2 leaving a hinge at the shoulder stitch line.
  • Cut along LINE 3 leaving a hinge at the neckline stitch line.
  • Cut along LINES 4 & 5 leaving a hinge at the armhole stitch line.
  •  Mark sections A, B, C & D as in the diagram below.

Slash & spread |

Place some paper behind your pattern pieces. Draw a line on your paper (shown in red). Anchor down section A with tape or pins, lining up the pattern CF with the one you just drew. Draw a couple of lines to show the amount being added (the orange lines), keep them parallel with CF. Draw a line to show where half the amount being added is.

Open LINE 1 out the amount you need to add for your FBA, pivoting the pattern from the hinges at the armhole and shoulder. Section B BP moves out half the total amount needed. Keep SECTION D parallel the with CF and allow to move outward so the full amount needed is added. Let front sections slide into position and overlap sections C to allow the pattern to open wider and stay flat. Note how the hem is staggered and the SECTION D is now too short. 

Tape everything down and redraw the hem and shoulder seam and smooth the armhole curve. Redraw your front facing so it is the same shape as the altered neckline. Toile to check your alteration.

If you find the above method doesn’t work for you, you may find it necessary to add a bust dart for a better fit.

FBA | Adding a bust dart

  • Find the Bust Point (also called the APEX) | The Bust Point (BP) or Apex is already marked on The Rochester pattern for you. As this style doesn’t have a bust dart, compare your BP with the pre-marked pattern one. The BP is going to move and drop anyway during your alteration. The FBA will make the dart drop around ¼” to ½” (6mm – 12mm) and if it’s too high we can adjust this later once the dart has been added. If you are very low busted (the BP needs to be lower more than 1.5” / 3.8cm), lower it a little now, and then go back and get it perfect later. You’re going to need a toile to check the final position when you’ve completed the FBA.


GOOD TO KNOW |

  • Your BP is the most prominent point of your boob – usually the nipple.
  • Bust darts point towards the BP but the dart tip is set back so not to create a pointy end.
  • B cup patterns usually have the dart tip set back 1″ (2.5cm) from the BP, but you can adjust this to suit you.

Draw the Lines | 

  • Using a copy of your front pattern, mark the seam allowances so you know where the stitch line is.
  • LINE 1: Draw a line from the BUST POINT (BP) right down to the hem, parallel with the CENTRE FRONT LINE. Draw a line from the BP to a point about a ⅓ of the way along the armhole.
  • LINE 2: Draw a line from the BP to the side seam – this will be your dart (you can adjust the exact position later if necessary)
  • LINE 3: Draw at a right angle from CF to intersect with LINE 1 (not crucial where).

Cut the Lines | 

  • Cut along LINE 1. Start at the hem and cut to the BP and then to the armhole. Cut UP TO stitch line but NOT through it. Cut from OUTSIDE of the pattern up to the same point on the armhole stitch line, leaving a 3mm hinge of paper.
  • *If you hinge your armhole from the outside edge of the pattern instead of the stitch line, your armhole increases in length and then your sleeve won’t fit.
  •  Cut along LINE 2 through the centre of bust dart towards the BP, leaving a hinge at BP.
  •  Mark sections A, B, C & D as in the diagram below.

Slash & spread |

Place some paper behind your pattern pieces. Draw a line on your paper (shown in red). Anchor down section A and D with tape or pins (bear in mind, D will have to move again), lining up the pattern CF with the one you just drew. Draw a couple of lines to show the amount being added (the orange lines), keep them parallel with CF.

Open LINE 1 out the amount you need to add for your FBA, pivoting the pattern from the hinges at the armhole and BP. Keep SECTION C parallel the with CF. Let front section slide upwards and allow the bust dart to open wider to keep pattern flat.

Note how the hem is staggered and CF is now too short. Tape section A, B & C down.

Cut open line 3, no need to leave a hinge this time. Keep CF in line and slide section D down so the hem is level again and tape.

Tape everything down and redraw the bust dart and shoulder seam and smooth the armhole curve.

True the bust dart | Draw the new bust dart legs. Remember, the tip of a bust dart is usually 1” (2.5cm) from the BP, but this can change depending on you – it could be ½” (1.2cm) if you are small busted and up to 3” (7.5cm) if you have a fuller bust. Fold your dart, along the dart legs as if you are stitching your dart closed, with the excess downwards. A bit of tape doesn’t go amiss to hold the dart temporarily in place. (Now is the time to go excess upwards if that is your preference). While the dart is still folded, use a tracing wheel along the side seam of the pattern to transfer through to your dart, creating the dart extension. No tracing wheel? Cut along outside the edge of the pattern, straight through the dart excess. Unfold your dart. The dart extension needs to be exactly the same shape as your side seam when the dart is stitched together so it doesn’t pull at the side seam.

Toile | Now do a quick toile to check your alteration and the position of the bust dart in relation to your BP/apex. The most likely alteration now is you need to lower the dart or change the length. You can pin the paper pattern together and try it on to check the dart position first but keep in mind paper doesn’t behave the same as fabric and bust darts tend to drop a little more once they are in cloth.

Not sure how to alter the dart or need a little more help with truing?…The Lower a Bust Dart Tutorial will help with that!

Might be useful links |

The Kitty Dress FBA Tutorial

The French Dart FBA Tutorial