Posted on

Learn to sew a narrow curved hem

One of my favourite details of The Simone Camisole is the lovely gently shaped hem.

A shaped or curved hem doesn’t really like having a big hem allowance, it’ll look twisted and ‘ropey’ so a narrow hem is the best option. They can be tricky to finish neatly if you are working with a delicate or lightweight fabric, which is often the fabric of choice for a camisole. Different fabrics can require different construction methods so it’s always nice to have a little arsenal of alternative methods in your tool box should the need arise.

If you are ever in doubt of the best method to use just do a little test on a scrap of fabric. If you are testing the best way to hem a curve, remember to do your testing on a similar shape.

| Sewing a Narrow Curved Hem |

WS | wrong side of fabric  RS | right side of fabric  SA | seam allowance

TIPS |

  • Press at every step.
  • If you have a ‘bouncy’ fabric that doesn’t hold the press line (like the one I used!) use a few pins to help, but first check they don’t damage your delicate fabrics.
  • If you carefully tack your hem in place along the top edge of the hem allowance, it will give you a guide to follow when you stitch the hem from the RS, ensuring you catch all the allowance.
  • A good final press and steam will shrink any stretching that may have happened on the curved areas.
  • For reference: the fabric I have used for this post is a fine, slippery, (allegedly) silk crepe de chine that was lurking in the stash.

Double Turn Hem | 1cm Hem Allowance

This is my usual method and the one that you will find in The Simone Maker Instructions. The benefits are it’s easy and works for most fabrics. It gives a small, neat hem with all the raw edges enclosed.

  • Machine a row of stitching 5mm from the raw edge all the way around the hem

  • With WS up, press up the raw edge of the hem using the stitch line as a guide.
  • The stitch line should roll to the WS. (I’ve held the hem in place with a pin for the photo).
  • Fold again and press, enclosing the raw edge
  • Stitch the hem, being careful to catch all the hem allowance. (You can see, above, I have partially stitched the hem).

We have a tutorial for the Maria Apron Hem HERE it’s the same principal but there are a few more photos.

Overlock and Turn |

An overlocker (a serger) makes the edge easier to fold neatly, especially if you are double turning the hem. If you don’t have an overlocker you could experiment and see how it looks with your neatening stitch on your usual machine. You can adjust the differential feed of your overlocker on curved hems so the fabric gathers slightly and this will help when you turn up the hem, but I didn’t find it necessary for The Simone pattern in this fabric.

Single turn | The first example is turned once so you can see the overlocking to the WS

  • Overlock the edge of the hem
  • Fold and press the hem the width of the overlocking to WS. Once you’ve done this a few times you may be comfortable to just fold and stitch in one go.
  • Stitch hem

Double turn | This example is turned twice so the overlocking is enclosed, giving a slightly more expensive looking finish.

  • Overlock the edge of the hem.
  • Fold and press the hem the width of the overlocking to WS and stitch.
  • Fold again and stitch on top of your first row, keep folding as you stitch.

  • Again, once you have done this a few times, and are comfortable with the method, it is possible to double fold and stitch in one go.

Traditional Narrow Rolled Hem Method |

This is the usual rolled hem tutorial you’ll often come across. I usually use the first method I listed above because I’m not a huge fan of trimming SA (that’s most likely due to my industry training as it’s not a thing we would have done and I’m a bit lazy if I’m honest), but the benefits of this method is you can make a very narrow hem on trickier lightweight, sheer or slippery fabrics. It would be your go-to method if you ever needed to hem a beautiful floaty circle skirt.

  • 1.5cm Total Hem Allowance
  • Stitch 1cm from raw edge of hem. (yellow stitching)

  • Use the stitch line as guide and press up the raw edge of the hem to the WS, the stitch line will be close but not right on the folded edge.

  • Stitch as close as you can to the folded edge and through all layers and on top of the first row of stitching. Press. (green stitching)
  • Trim away the extra hem allowance as close as you can to the stitch line.

  • Turn the hem again, so all raw edges enclosed and stitch. (blue stitching).
  • Voila! The tiniest tiny, neatest hem!

You can of course use a special rolled hem foot, but I don’t own one so you are on your own if you go down that route!


Posted on

The Simone Set | add a permanent stitched crease

During one of the numerous samples I made while testing the Simone Set, it occurred to me a really nice detail to add to the trousers would be to sew a permanent crease down the front legs.

A stitched crease, which is basically a pintuck, is sometimes seen on on tracksuit bottoms and often on a tailored trouser but I liked the idea of adding it to Simone. Stylewise, it’s casual and relaxed but adds a thoughtful design detail.Pictures via pinterest – links: Trouser inspiration board

While I was having a little research on the old internet I found that there are a few names trouser creases are known by;

  • permanent stitched crease – a phrase which does remind me of Farah slacks from the 70s.
  • my favourite term I came across was the traveller’s crease. Somehow manages to conjure up images of travelling salesmen in varying tones of brown polyester and yet, at the same time, images of glamorous starlets on epic cruises in the 1930s and 40s.
  • and pintuck being the simplest term.

The stitched crease is often just on the front trouser leg, but can be added to the back leg if you want. We will be sewing our permanent crease all the way along the trouser leg but if you had a style of trouser with a dart you would finish your crease at the base of the dart and the back crease would finish at the crotch level.

According to the internet, The Crease has magical properties. The claim being that a vertical line, in theory, lengthens the leg. Hmmm. I’m a short 5’2″…I still look 5’2″ but with a sharp looking stitched crease.

Anyway, it really is quite a straight forward hack, but does require accuracy. The crease needs to be stitched before you start constructing your trouser.

| How to stitched a permanent crease |

This is the first time I’ve used a ¼ scale pattern to illustrate  – how cute are tiny trousers!

TIP | If this a totally new-to-you technique remember that you can always do a few a little tests on a scrap of fabric. That is something that is part of my sewing process; testing, sampling, a practise run, are all the same thing. It can save you from disasters, sometimes you just don’t know how a fabric will behave or if you will like the result and testing can give you some extra confidence.

WST | wrong side of fabric together  RSU | right side of fabric up  SA | seam allowance  WB | waistband casing

PRESS |

  • With WST, fold the front trouser leg in half.
  • Take care to line up at the hem and the lower legs and keeping the trouser leg on grain.
  • Press a crease along the entire length of the fold.
  • Use steam if suitable for your cloth and a lifting up and down motion rather than dragging the iron along the fold so you don’t mis-shape or stretch your fabric.

SEW |

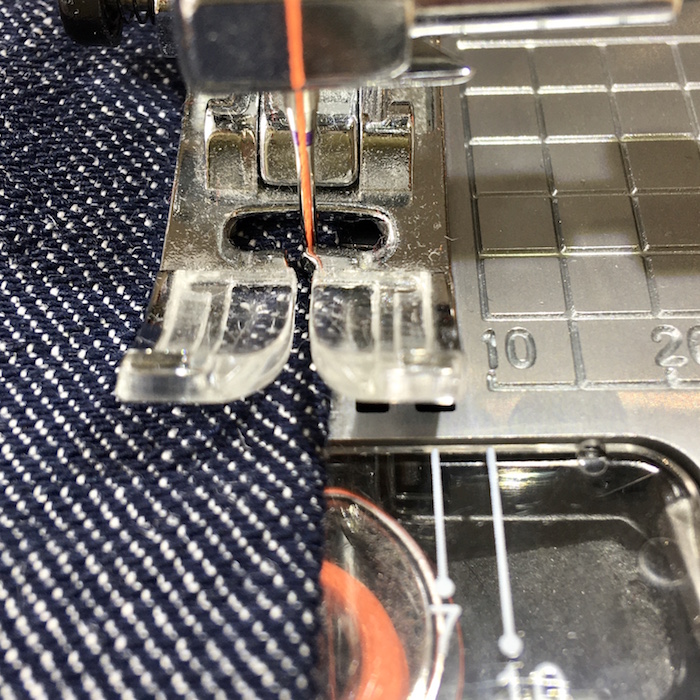
  • Set your stitch length slightly longer than usual to around 3mm, a longer topstitch length will help keep your stitches neater and straighter looking.
  • A matching coloured thread will be much more forgiving of any wobbles than neon orange!
  • Keep the trouser leg folded with RSU and position your needle 1.5-2mm (1/16″) from the folded edge.
  • Edge stitch all the way along the crease. I prefer to use my regular presser foot, but feel free to use an edgestitch foot if you have one.
  • Take your time. Go slowly and steadily to ensure your stitching is a straight as possible.
  • Press gently, the pintuck stands up rather than laying to either side.
  • Once both legs have their stitched crease, carry on and sew  your Simone trousers following the Maker Instructions.

A TINY PINTUCK VERSUS A BIG TUCK |

It’s important to sew a small pintuck. Visually it will look better but by sewing a permanent crease in the front we are actually reducing the width of the trouser and therefore the amount of ease in the width of the trouser. This means the garment measurement will be slightly smaller = the garment will be slightly tighter on the hips. It’s only a reduction of about 6-8mm in total so you won’t really notice but the bigger the pintuck the more you are reducing the trouser width by. You can see the difference in sizes in the photo above. The trouser leg at the bottom has been stitched with our small pintuck but the leg on top has been stitched using my machine foot as a guide and is stitched 7mm from the edge. You can see that’s quite the difference in width and will be doubled over 2 legs – a total of 2.8cm smaller in fact.

WAISTBAND NOTES |

It’s also worth noting that technically, your waistband pattern will now be a smidgette longer than needed as you have just removed a whisper of width from the trouser front. If your fabric has a little ‘give’ you probably won’t notice; it wasn’t an issue at all in this denim. But some fabrics are very solid and stable and can be less accommodating! If you do find your waistband casing pattern is a tiny bit bigger than your trouser body you could take a bigger seam allowance to close the waistband seam. Alternatively, ease the waistband onto the trouser body, it’s going to be elasticated so will look just fine.

I’m really excited to see your Simone Set, don’t forget to share your makes with us on Instagram.

Tag @mavenpatterns and we will share them with all our lovely Maven Makers!


Posted on

Introducing our new pattern – The Simone Set

Hello and welcome!

We are so excited to share our latest pattern with you … The Simone Set!

The Simone Set is a two piece ensemble that will take you from the (home) office, to the school run, a kitchen disco or even for sleeping… just about anywhere really!

The camisole top and the trouser set work perfectly together creating a pulled together, coordinated look with ease and they work equally hard as a stand alone pieces too. Each piece will become a wardrobe staple in their own right as invaluable mix and match separates to wear with your other makes. The Simone Set offers flexibility allowing you to make different size for your top and your bottom.

The delightful camisole top has bust darts, a gently shaped hem and two strap options. I hope you love the double rouleaux straps or the wider strap option (for a little bra strap coverage) as much as we do.

The trousers are slim fitting with front slant pockets and an elasticated waist and a drawstring. They are smart enough that you can wear these with confidence from the bedroom to the boardroom (if those are even separate things anymore), the perfect foundation for your holiday wardrobe (when that’s a thing again) or you could size up for a more relaxed fit and a spot of very glamorous lounging.

Designed for light to mid-weight wovens, you will be able to create many looks with this versatile pattern from Luxe-look Loungewear in a silky fabric such as bamboo silk, viscose, cool and smart in linen or create a co-ord set in a bold matching print for a faux jumpsuit look. Other suitable fabrics could be double gauze, soft flannel, ponte de roma, rayon, crepe de chine, cotton lawn, chambray.

The Simone Set is currently available in PDF only, but we hope to print her soon.

The Simone Set is and Advanced Beginner pattern and is available in UK sizes 8-22 (see listing photos for more detailed info).

As always, we will be donating 20% of the profit from our launch weekend. The charity we have chosen for the Simone Set is The Birmingham Children’s Hospital Charity who do such incredible work for children and families all over the UK.

Happy Sewing from Maven HQ


Posted on

The Beginners Sewing Summit – make a midi skirt with me!

Sew an Easy Midi Skirt with me!

We are teaching at the 2021 Beginner Sewing Summit, which is our first ever online sewing class! Come and sew an easy midi skirt with myself and Eve, it’s a great beginner project or take a look at one of the other classes – there are over 40 to choose from! Best of all the classes are FREE to watch May 3rd- 7th 2021, you could learn the basics and new skills while completing fun projects like fashion, home decor, and cute accessories.

UPDATE: Sewing Summit 2021 is over but this online class is still available to purchase with The Sewing Summit via the link below.

AD/AFFILIATE LINK: If you decide to purchase the lesson with Rebecca Page and the Sewing Summit through our link, we receive a commission.

CLASS DESCRIPTION | In this class you will learn to make a simple jersey midi-skirt with an elasticated waistband.

You will learn how to take your measurements, cut your fabric and create an easy to wear skirt to fit you and that you’ll love wearing. As sewing with knits can sometimes be a bit daunting, we’ll talk you through the whole process!

All of this information is in the class video but we thought it would be nice to have somewhere to refer to!

FABRIC REQUIREMENTS | 

Any knit fabric! We recommend using a cotton or modal knit fabric with at least a 5% elastane content. The elastane will help your skirt retain its shape.

SKIRT PATTERN |

The skirt doesn’t need a pattern! It’s just a rectangle that we can mark directly on the fabric and cut. The amount of fabric to buy will be based on your overall length of the skirt.

  • For simplicity we’ve used inches in the video but have added metric conversions below (we’ve rounded them up to make sensible measurements rather than exact conversions!)
  • SIDE SEAM ALLOWANCES | INCHES: we have allowed ½” seam allowance to join the side seams (so add 1″ seam allowances extra to width). METRIC: if you are team metric allow 1.5cm to join the side seams (so add 3cm seam allowances extra to width).

To work out your fabric requirement follow the guides below.

The amount of fabric to buy will be based on your overall length of the skirt plus some allowances.

When purchasing your fabric it’s a good idea to purchase extra fabric to allow room for cutting out and any shrinkage as you will need to prewash your fabric before before you begin.

LENGTH: Take your ideal skirt length and add 5″ (13cm)  to calculate the length of your fabric required. Not sure how long you want your skirt? Measure something you already own or allow a little extra and it can always be cut to length later.

WIDTH: Take your hip measurement, at your widest part, and add 1″ (3cm) for seam allowances to calculate the width of your rectangle.

  • For example – if you have a 40″ hip – you will need 1 rectangle measuring 41″ wide (40″ + 1″ seam allowance).
  • And in metric – 105cm wide rectangle (102cm wide + 3cm seam allowances)

Not covered in the video but…should your hip measurement be more than the width of your fabric you will need to cut 2 rectangles so buy twice the skirt length. Your skirt will have 2 side seams, just use the same method we describe in the video to join your seams. As you have 2 seams that’ll give you the option to have a split in each seam or on just one seam, whichever you prefer! The formula to calculate the width of each of  your rectangles will be – half your full hip measurement and add 1″ (3cm) extra as seam allowances.

  • For example – if you have a 66″ hip – you will need 2 rectangles measuring 34″ wide (33″ + 1″ seam allowance).
  • And in metric – if you have a 168cm hip – 87cm wide rectangle (84cm wide + 3cm seam allowances)

You will also need |

  • Polyester sewing thread.
  • Ballpoint, stretch or jersey machine needle.
  • 1″ (2.5cm) wide elastic – enough to wrap around your waist with an overlap (any width between ¾″ – 1½” (2-4 cm) will be fine if you have it in your stash!)
  • Safety pin
  • Marking tool – chalk or fabric pen
  • Ruler
  • Plus, the usual sewing equipment – sewing machine, scissors, tape measure, pins, iron

Looking for some tips on sewing with knit fabrics? Check out our tutorial here!

AD/AFFILIATE LINK: If you decide to purchase the lesson with Rebecca Page and the Sewing Summit through our link, we receive a commission. Thank you!