
 Happy Holidays everyone…
may your bobbin always be full and your scissors always be sharp!
And a very big thank you for all your support of our tiny independent pattern company!

Happy Holidays everyone…
may your bobbin always be full and your scissors always be sharp!
And a very big thank you for all your support of our tiny independent pattern company!


Great news! Our Barcelona pattern is now in print!
We have a very limited number in stock this week, as I managed to get a pre-order sent, but more will be arriving at the weekend so there is still plenty of time to make your party dress!

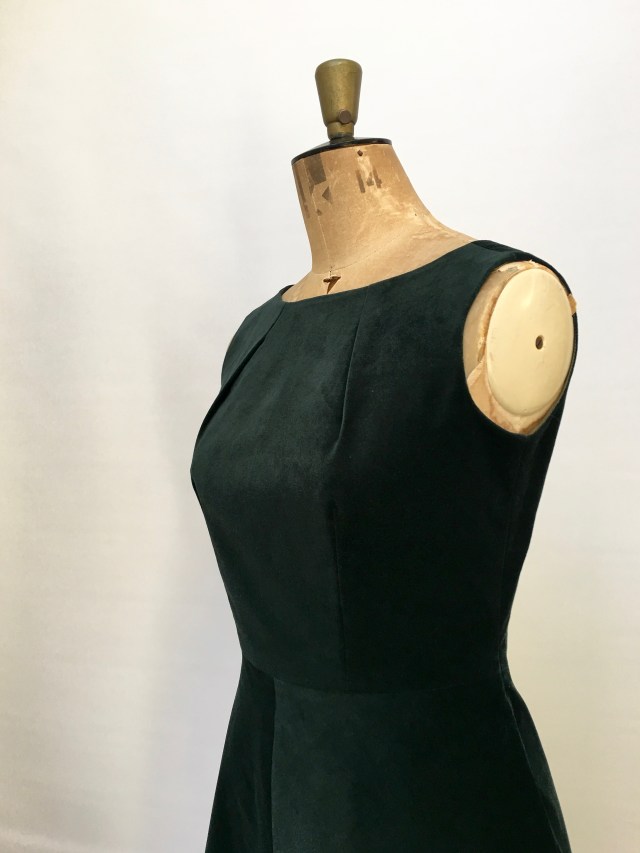
the Barcelona in green velvet, fully lined using this tutorial

Or will you make a cosy cord skirt with this tutorial?

and which back will you pick, classic high or sassy v?
![]()
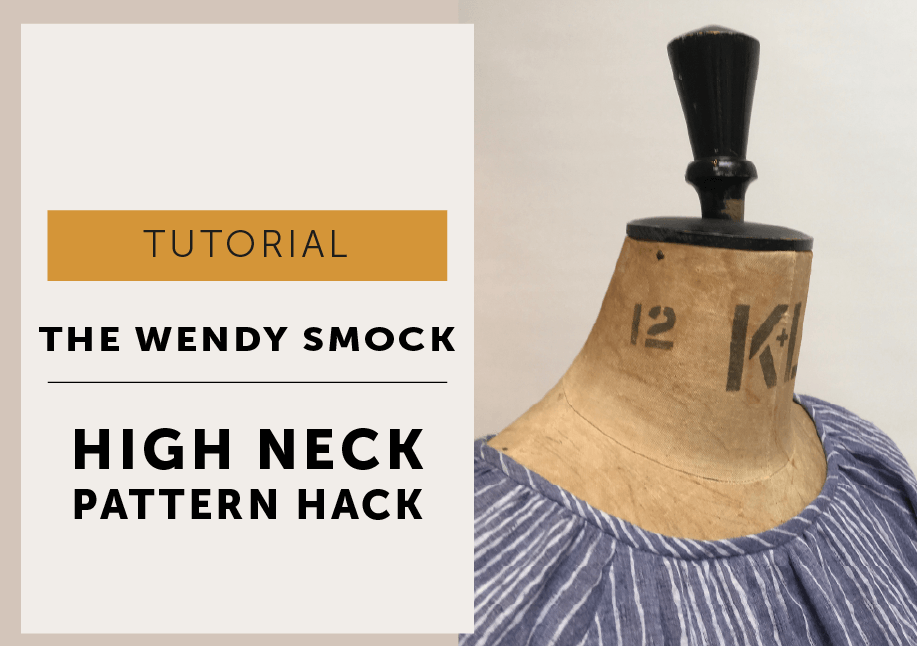
How do you adapt a simple smock pattern into a high neck version? This hack shows you how to raise and reshape the neckline while keeping the relaxed smock silhouette intact, so you get a more covered, structured finish without losing the ease and comfort of the original design. In this tutorial, we walk through the pattern changes step by step so you can adjust the neckline smoothly and keep the proportions balanced throughout the garment.

Sometimes I make things up as I go along, this pattern hack is one of those occasions. One day, I decided I fancied making the Wendy Smock with a slightly higher neck.
I know what I wanted the end result to be but sometimes I make things up as I go along, and change my mind. I let it develop. I learn.
Sometimes good design solutions come from the mistakes. Sometimes they’re just mistakes.
I’m telling you these things because I hope it gives power to your making, to not look at mistakes as a complete disaster but, at worse, as a slight annoyance on a learning curve or even a design development.
Also, I pressed the sleeve seams in the wrong direction the first time! Hee Hee Hee! Look out for the warning below!

Abbreviations: SA | seam allowance CB | centre back CF | centre front
Tools
Construction
I constructed the high neck smock using the same methods as the original Maker Instructions. The only difference I made was to neaten the armhole seams together, rather than open, as I was using a nice lightweight fabric and pressed them towards the body. I also finished the cuff with bias binding rather than using elastic. Do try her on after gathering the neck and cuff but before finishing with the binding as you can easily adjust the gathering to suit you.
Pattern alteration
So this will involve a bit of pattern cutting – nothing too complicated!
It’s a good idea trace off your original pattern so you can keep it intact to make another original version of the Wendy smock later. If you are tracing off the pattern leave excess paper around the edge to do the following alterations. If you have a PDF version of Wendy, and happy to print another if needed at a later date, you have the option to tape extra paper behind as I have.

Tape a bit of paper behind the front pattern piece. Use a ruler and extend the CF line and extend the armhole line. Mark the 1cm SA on all pattern pieces (this will be your actual stitchline).


Repeat for the sleeve and the back pattern.

Cut away excess pattern paper at the armholes, but leave at the neck.
Pin the pattern together

Match up the pattern at notches and at the original neckline and lay with one stitchline on top of the other and pin the body to the sleeve along the stitchline. Don’t worry about pinning around the curve of the armhole, you want to keep your pattern flat.
Raise the neckline


On the CF line mark a point 5cm (2”) above the original neckline and at 90°angle to CF line.On the CB mark a point 2.5cm (1”) above the original neckline. Again at 90°angle to CB line. Fold the sleeve in half and mark a point for the shoulder 1.2cm (½”) above the edge of the original pattern.

These are the measurements I used and I got them by trying on an old Wendy Smock and measuring how much higher I wanted the neck to sit. You can change them but remember that the finished neckline doesn’t stretch and needs to be big enough to go over your head when it’s gathered.
Draw a lovely curve between these points.
Make sure your line dissects CF & CB at 90° right angle, or you’ll end up with a weird pointy neck shape there. You can be a bit free and easy with the shoulder mark, concentrate on getting a smooth line, if you go a little bit either side it’s fine.
Use a tracing wheel to transfer the new neckline to the pattern piece below before unpinning the pattern pieces.
OOPS! Originally I pressed the armhole seam towards the sleeve and then changed my mind when I tried it on and pressed it towards the body instead, so bear that in mind if yours looks slightly different to the photos. Sometimes you’ve just got to make things up a bit as you go along.
The SA will be pressed towards the body of the garment and the seam allowance needs to get caught in the neckline during construction. When it is pressed to one side during construction SA needs to fold back and be exactly the same shape as the garment or the SA and garment will have a little ‘fight’ and possibly distort the garment out of shape at that point. So we need to ‘true’ the pattern.


Take the front pattern and fold the SA along the stitchline and to the wrong side of the pattern. Pin to hold and cut along the new neckline. (The photo is the sleeve pattern but same method!) Repeat for the back pattern.
Now check the body patterns against the sleeve pattern to make sure they are the same length…
Place the front and sleeve pattern together at the armhole. Align at the notch and check the seams are the same length. Make the sleeve SA is the same shape as the front SA as they are pressed in the same direction. The patterns should be the same length but you can add or reduce the sleeve pattern a smidge so they are exactly the same length. (This type of sleeve doesn’t need any ease). Repeat with the back armhole seam. Trim the sleeve pattern at the neckline.
Now you are ready to cut out and sew your new Wendy.
CONSTRUCTION
As I said above I constructed high-neck-Wendy using the same method as the original Maker Instructions. The only difference I made was to neaten the armhole seams together, rather than open and press them towards the body. I also decided to use bias binding to finish the cuff rather than using elastic. Measure your widest part of your lower arm to give yourself a finished measurement. I advise trying Wendola on after gathering the neck and cuff but before finishing with the binding as you can easily adjust the gathering. For the neckline gathering, I settled on a measurement after trying her on and fiddling with the gathering. I actually made my cuff finish at 22cm but it’s a smidge small and a bit annoying when I’ve worn it for a while, so the measurements below are the original cuff measurements when elasticated, adjust to how you want it to feel when wearing and more importantly moving your arms!
These are the measurements I ended up using – treat them as a guide and adjust to suit you.

In the spirit of making it up as I went along…Try your top on as you go to check you are happy with how it’s fitting. Even though I usually quite cheerfully wear Wendy as is, straight from the packet as it were, with a higher neck I felt the proportions were wrong for me (I’m 5’2″ and a 36″ bust, and use the small size – if that helps anyone!). For me, she was too loose and too long. You could do this alteration at the pattern stage but I just tried the top on (inside out) with the sleeves attached, side seams closed and neck and cuff gathered but not bound. I literally just pinned on myself first and then sewed a new seam and trimmed off the excess.

I found that I needed to take in 2.5cm/1″ on the doubled fabric (5cm/2″ each side in total, 10cm/4″ in total from the whole garment) at the underarm, straight down to the hem and back to the original stitchline at the cuff.

I made her shorter too, but instead of cutting any off I made a very deep finished hem of 6cm.

Hem. Turn and press the hem up 1cm and then fold and press again at 6cm. Tack and topstitch.
NOTE: If you have tapered the hem you will need to make sure the hem allowance is the same shape as the body when it is folded up into place – as we did for the SA earlier. If the side seam is straight it should be fine, but fold the pattern as if you were hemming it to make sure it is ‘true’ and the hem allowance is the same shape as the body.

TIP / Use a safety pin in the back of the garment so you can tell which is the back and front neck easily during construction – it’s quite easy to get them confused!

On the finished garment, I hand stitched a running stitch along the inside of the binding at the back neck.
And that, as they say, is that!


I’m so pleased to announce our Apron kits are now available online!
Our Maria Apron kits were very popular at the shows this year and so we have resourced the fabrics and voila – here they are in time for Christmas!
These kits contain everything you need to make your own Maker’s apron and would be a beautiful gift for a lucky Maker friend or a lovely project for you!
We have two kits to choose from, each with enough fabric to make version A of The Maria Apron, along with the paper Maria Apron pattern, interfacing, thread, label & Maven tote bag.
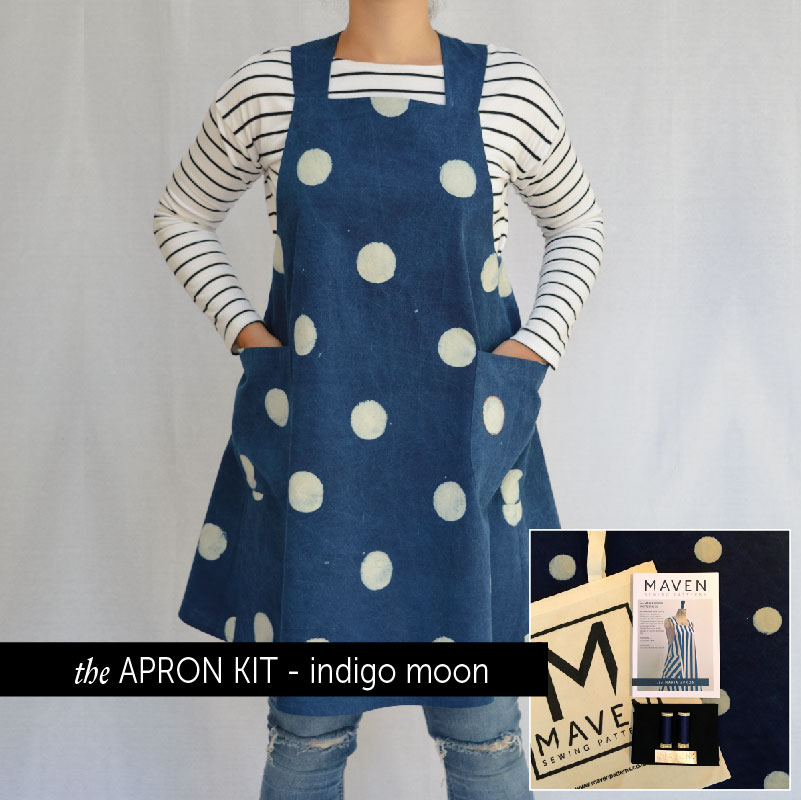
Indigo moon is a beautiful block printed cloth, printed by Artisans in India using traditional techniques and coloured with natural dyes. Because block printed fabrics are printed by hand they will never be perfectly printed in the same way as mass produced and digitally printed cloth is. They have irregularities in their print, making them unique and these should be valued as part of their beauty and charm. You can find the Indigo Moon Kit here.

Our stripe kit has a lovely soft denim in a denim/ecru colourway with a 2.5cm stripe, giving you the opportunity to make a feature of those large, useful pockets by experimenting with the stripe direction. You can find the stripe kit here.


The Maria Apron Paper Pattern
Your chosen cloth – enough for VERSION A
Fusible Interfacing
2 reels of 100m Gutterman sew all thread
Maven label – faux leather & 100% paper
Maven Tote Bag
Click the link below to take you to the Apron Kit listings to view all the details
We are happy to sell the fabric separately by the metre (or parts of a metre) – Indigo Moon is £12 per metre / Stripe is £16 per metre.
Message us via our contact page or send us an email to [email protected]


