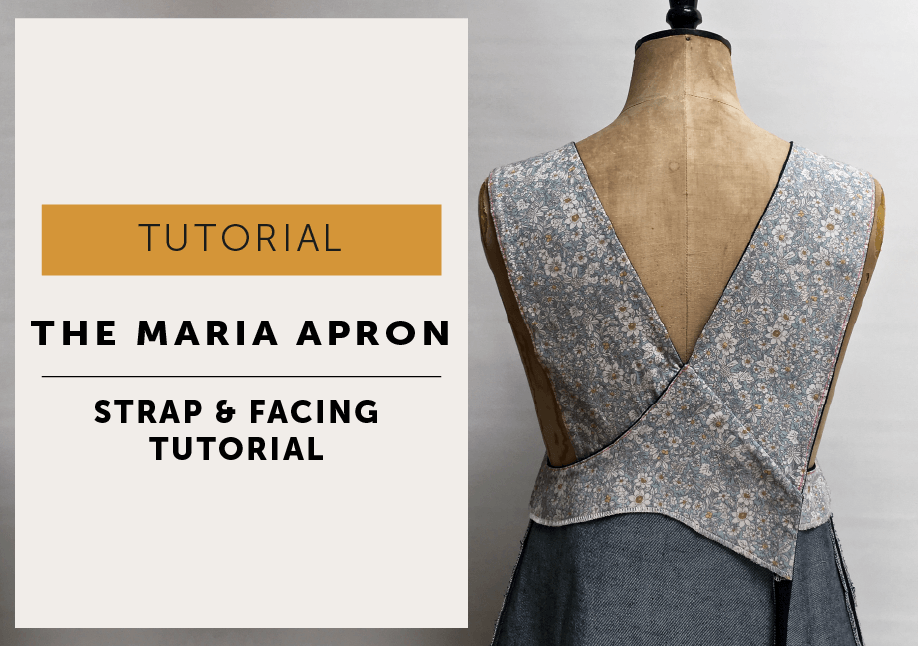
Posted on

The Strap & Facing Tutorial – the Maria Apron

Oh wow! This photo tutorial has turned into a monster tutorial on how to sew the straps and facing for The Maria Apron!

You will need to have followed the instructions included with the pattern so the side seams are closed and neatened, the pockets attached and the facing is made.

Contrast | I have cut the UNDER STRAPS and the FACING in a contrast fabric so it is easier to see in the photos and that’s a good option to consider if you are making an apron in a heavier denim.

Interfacing | The facings are BLOCK FUSED as described in the pattern. I haven’t put any interfacing in any of the straps for the aprons I’ve made to date, and the pattern doesn’t suggest it, but if you are using a lightweight fabric you can BLOCK FUSE the understraps so they have a little more body and are a little more robust.

Abbreviations |

SA | seam allowance         RS | right side      RSU | right side (of fabric/garment) up      RST | right sides together          CB | centre back

Make the straps | 

You will have cut one pair of TOP STRAPS (has a single notch) and a pair of UNDER STRAPS (has a double notch). The under strap is slightly narrower than the top strap so that the seams roll to the underneath and not show on the front and give a professional finish!For each strap: Place one under strap and one top strap with RST and stitch together along the longest seam with a 6mm SA. (it doesn’t really matter if you stitch the other seam first, but do try to be consistent!)
Press the seam flat and then press SA towards the under strap.

Understitch on the under strap, close to the seam line and through all the seam allowances.With RST close the other seam and press flat.Turn the strap through to RS.

Press the seam so that it rolls towards the under strap. I haven’t topstitched this apron as I’m going to do some hand stitching on it later, but if you wish to topstitch your straps now’s the time!

Attach the facing |

With RST pin the facing to the apron body at the armholes only and stitch the seam closed with a 6mm SA.

Press the SA towards the facing and understitch. Gently press the armhole without stretching.

Place the straps |

This bit can be a smidge confusing, so first of all, we will just roughly pin the straps in the correct place and make sure they are not twisted. After, we will go back and pin them in exactly the right place to sew them.

*a little side note | in the booklet instructions I have illustrated the apron RSU, below I’ve photographed it WSU – it doesn’t really matter which way you do it, it’s just to get those straps placed and laying correctly (it would make sense for you to follow one set of diagrams though!). The key point is to ensure they are not twisted and when they are finally being stitched in place the straps and apron are RST.

Lay your apron body on a flat surface and place the straps as in the photo above. Make sure you use the double notches (marked in pink) to get the correct strap to the correct back.Use one pin to hold each strap in place.

Take the strap on the right and pin to the opposing front position.

Repeat for the 2nd strap. At this point, you can check the straps are not twisted and are crossing over at the back.

Sewing the straps |

The important thing to realise when placing the straps ready for sewing is that you have to think about where the final stitchline will be.

I’ve marked in the SA with chalk as it helps to get the strap in exactly the right place – everything needs to meet at those intersecting SA/STITCHLINE points. Because the straps are on an angle it can be tricky to get your head around making everything line up, but all you have to do is to work to the FINISHED STITCHLINE when placing the straps – if you don’t get that point snuggled right up against the facing that’s when you can get a step or a lump.

Back straps |

 Place the straps to the apron with RST (check your notches are still at the same end).Place the strap right next to the facing – make sure it is at the 6mm stitchline point that you are concentrating your effort on (SEE THE RED ARROW ABOVE!). Pin to hold.

The other end of the strap needs to be placed on the point where the 1.5 cm SA/CB line (marked in white) intersects with the 6mm SA / STITCHLINE on the UNDERSTRAP (the red line). (See the RED ARROW again!)

Tip | Unless you have been super accurate with cutting and sewing so far your notches may not exactly match up – that’s OK. Their main purpose was to get the strap placed the right way around, so if they are a little bit out don’t worry – concentrate on placing the end of your strap to the CB line. (If they are a lot out- go back and check against your pattern as you may have stretched the top edge or taken the wrong SA somewhere.)

Pin or machine baste in the SA to hold.

Wrap the facing around the end of the strap, so the SA and stitching will be to the wrong side of the finished apron.Pin the facing to the body.

Front straps |

APRON STRAP TUTORIAL

Take one of the front straps you had temporarily pinned previously, unpin and take the strap around to the front of the apron, so they will be RST.

Place the front straps and apron body RST, slide the strap underneath the facing and keep the facing out of the way! Nestle the front strap right up to the facing at the 6mm SA/stitchline point and pin or machine baste strap in position.Wrap the facing tightly around the strap. Pin, keeping the SA and stitching on the same side as the facing so it will be to the inside of the finished garment. Repeat for the other front strap.

And pin across the front facing.

Stitch & trim the facings |Use a 6mm SA and stitch across the front facing. Trim at each corner to reduce bulk.

Use a 6mm SA and stitch across the top of the back facings. Close the CB seam with a 1.5cm SA. Trim corners to reduce bulk.

Tip | if you are using a heavier fabric and the corners are really thick, you can gently bash them with a hammer to soften. It’s a good idea to sandwich your garment between a layer or two of spare fabric for a bit of protection first!

Now you just need to turn through to the right side and press.

The facings and understrap should not be visible from the front.

Finish the facing! |

While you’re here I may as well show you a picture of the final facing stage!

Once you have pressed your facing, pin through the SA at the underarm so the body side seam is directly on top of the facing side seam. ‘Stitch in the ditch’ of the seam to stop your facing poking out while it’s being worn. I’ve used a contrasting thread but in a matching colour it will completely sink into the groove of the seam and disappear.

Now you should be ready to hem your apron – we have a handy tutorial here!

Posted on

The Barcelona – in-seam pocket tutorial


So here at Maven, we do our in-seam pockets a little differently. You may have noticed our pocket bags have a curvy bit, which has many a function.

“So why a curvy bit, Mrs M? Go on then, talk pockets and garment construction.”

Oh well, if you insist!

  • That curvy bit acts as a hinge and it gives a bit of support to the pocket bag.
  • The curvy bit makes it easier to neaten around the edge of the pocket (especially if you are using an overlocker).
  • Our method of construction sets the pocket back from the seam edge so it is less likely to show.
  • We don’t have any snipping into seams to make a weak point – pockets are functional and need to be strong!
  • The pocket bag is overlocked together after construction, again, so it’s stronger.
If you’ve made a Maven Pattern before, this is the same construction method as our other in-seam pockets – The Barcelona just has different seam allowances because of the bias cut skirt.

Stripe matching |

I’ve covered the process of sewing with stripes and stripe matching in another tutorial called rather imaginatively ‘Sewing with stripes’.

I did match the pocket bags to the skirt, just to see if it could be done easily. All I did was lay the pocket pattern piece in position directly on the cut skirt panel as if it was ready to be sewn on and then traced the stripes onto the pattern. You don’t really see it unless you look for it, so most definitely not something to worry over unless your fabric is a little sheer and the stripes show through. In that case, I would avoid the issue altogether and cut them in plain cotton!

METHOD |

Interfacing | your garment is cut, make sure you have cut 2 PAIRS of pocket bags (so you have 4 bags in total). Transfer the marker dot positions to your garment; chalk, fabric marker pen, tailor tacks – whatever works for you.  Fuse the strip of interfacing to the pocket mouth on the FRONT body.

look closely – there is a pocket bag there!

Attach the bags | Place the pocket bags to the front and back garment, with right sides of the fabric facing each other, and so the notches on the pocket bags line up with the side seam notches and stitch together with a 1cm seam allowance.

Front skirt | Overlock (or neaten with your usual method) the raw edge of the pocket bag and garment together, starting and finishing about 3cm above and below the pocket bag.

Back skirt | Rather than starting the overlocking just above the pocket bag – start at the underarm and overlock the entire seam right down to the hem.

Press the pocket bags AWAY from the garment and understitch on the front pocket bags.

Side seam | Pin with right sides of fabric facing each other. When matching a style that has a seam that needs to be aligned I usually start by pinning that together first. Then I use all the pins and match all the stripes! Line up the pocket marker dots on the front body with the corresponding ones on the back body.

Take a 1.5cm seam allowance, start at the underarm and stitch down to the first marker dot, PIVOT * and stitch from the dot across the pocket bag until you are back at a 1.5cm seam allowance on the pocket bag. (The stitch line is marked on the pattern piece, so you could transfer the line across with chalk and a ruler if you wanted). Carry on around the pocket bag, and stitch TO the next marker dot, PIVOT again and continue down to the hem.

*TO PIVOT: stitch to the marker dot, leave your machine needle IN your garment, lift your machine foot and turn your work in the direction you want to stitch, drop your foot back down and continue to stitch – makes a nice tidy corner!

Reinforce each of the corners at the pivot point as in-seam pockets can take quite a lot of stress. Set your machine to a smaller stitch length and just stitch a second machine row DIRECTLY ON TOP of your first row of stitching about 3cm either side of each marker dot. Don’t forget to put your stitch length back to your normal setting!

Neaten | Overlock the front side seam from underarm to hem, all the way around the pocket bag – it’s easier because of the curved shape!!!

Press the pocket bags towards the front body. Press the side seams OPEN above and below the pocket bag, as far as you can.

And from the right side…

Just to prove there is actually a pocket there!

Now you get to swish around and smugly say “why yes I did make my dress…it’s got pockets!”

Posted on 2 Comments

The Barcelona – Neck Dart Tuck Tutorial

This isn’t a very complicated part of the Barcelona dress but a few extra photos never hurt anyone!

So what is a dart tuck? A dart tuck is really just a dart that is only partially stitched along the dart legs so the fullness is released below the stitching.

Because of the angle of the tuck, you will find the stripes won’t match.

Method |

Fold the tuck in half along centre fold so the notches at the neck align (I’ve placed a pin above the neck so you can see the notch) and the marker dots lay directly on top of each other. Push a pin through dots to help line up with each other.

Sew from notch to dot, pivot and sew across from dot to fold edge and backstitch.

You could stop sewing at the dot but a backstitch can be a bit untidy here and sewing across to fold helps to keep the tuck in shape.

While the tuck is still flat and wrong side up, press flat and along the crease for about 6cm past the stitching.  

The centrefold actually lines up with the end of the bust dart and the bust point if you need a visual to keep things straight.

Flip over to right side up and press the bulk of the dart towards the armhole and softly press the tuck for about 5cm past stitchline.

Edgestitch at neck edge in the SA to hold the bulk of the tuck flat. And that’s it!

As a little extra option…if you prefer a dart at the neck instead of tuck, just extend the legs of the tuck until they meet (red lines above) and just stitch as a normal dart.


Posted on

Stripe Matching an Invisible zip

Inserting an invisible zip

How to stripe match, match a zip across a seam and how to shorten an invisible zip.

Invisible zips (sometimes called concealed zips) strike the fear into many a sewist, and our lovely Barcelona dress has an invisible zip and stripe matching! Sounds a bit daunting, doesn’t it?

Don’t panic, I didn’t get this right first time – I practised and I unpicked. More than once.

Do please remember that there is no such thing as the sewing police and perfection can be truly overrated if it’s taking away the joy and not adding to it. If it’s near enough, if you’re happy to wear it, it’s good enough!

This is a new-to-me method of inserting an invisible zip, which does prove my point that there is always more than one way of sewing something and you’re never too old to learn. This method closes the CB seam before you insert the zip rather than after. The benefit of sewing it this way is there is no bump at the bottom of the zip issue to worry about. I know…mind blowing! My normal method of invisible zip insertion (stitch down each side of zip, stitch up from the bottom to close the seam) was fine (and if you prefer/are happy with that method, carry on – we’re not doing brain surgery here) but after a day of testing methods, I felt this one was better at controlling the stripe matching situation, not to mention the dreaded bump at the bottom of the zip situation.

The Origins

I discovered the original version of this technique when it popped up in my Instagram feed from Threads Magazine. The YouTube video is demonstrated by the delightful Kenneth D King. I’ve adapted the original technique a little bit to help with the stripe matching, I only close the CB seam to the bottom of the zip opening. The original method also closes the zip opening using a machine basting stitch. I also prefer to use an invisible zip foot, it’s just what I’m used to, but Mr King uses a generic adjustable zipper foot. The original video can be viewed here: YouTube LINK: Imperceptible Zipper by Kenneth D. King.

STRIPE MATCHING TIPS

  • see our ‘sewing with stripes’ tutorial
  • Take your time!
  • Use lots of pins and pin ALL the stripes together.
  • My philosophy of stripe matching is “Never Knowingly Under Pinned”.
  • Remember you are matching them at the STITCHLINE, not the outside edge!
  • Take your time (it’s worth saying twice).
  • You may find it easier to mark in your SA with chalk or fabric marker pen.

INVISIBLE ZIP TIPS

  • An invisible zip is always stitched from the top down to the bottom.
  • Invisible zips are placed RS of zip to RS of garment.
  • The coil (teeth) sits right on the CB line.
  • You never get to use the entire length of an invisible zip. You lose around 2.5-3cm (1″) as you can’t stitch right to the bottom because the zip puller is in the way. If you have a 56cm (22”) zip the finished length will be about 53cm (21”)
  • They are very easy to shorten, this method is actually easier if the zip is too long. Always shorten a CLOSED invisible zip AFTER it has been inserted.

And you can, of course, use this tutorial for both versions of The Barcelona, classic back or V back, striped or plain. Or any other pattern with an invisible zip, we don’t mind!

How To Sew an Invisible or Concealed Zip

TOOLS

Invisible zip, Invisible zipper foot, ordinary machine foot, ordinary zipper foot, and the usual sewing stuff!

ABBREVIATIONS

WSU: wrong side up | WS: wrong side | RSU: right side up | RS: right side | SA: seam allowance | CB: centre back

METHOD

You will have already spot fused the zip area with fusible interfacing.

Press the zip

Open the zip and lay on the ironing board with WSU. With a cool iron press the coils (the teeth) flat to uncurl them so they are easier to sew. WARNING! If your iron is too hot, the teeth will melt! Close the zip.

Close the CB seam

With RST pin CB seam together from hem to zip opening notch. Match the stripes together and pin to hold – remember you are matching them at the STITCHLINE. Tack or machine baste if you wish.

Close CB seam with 1.5cm SA using your normal machine foot. Start at the hem and stitch to zip opening notch and backstitch. Press the seam open and neaten before taking a minute to marvel at your stripe matching!

Place the zip

It’s really easy to get an invisible zip twisted as you pin it in. The RS of the zip will be facing the RS of the garment.

I find the best way is to lay the dress with WSU facing you, and then fold back the SA at the CB neck and use one pin on each side to hold.Place the zip FACE down on the dress, so WS of the zip is facing you. Open the zip a couple of inches and pin the zip tape to the SA on each side of the opening with one pin. This is just to place the zip without twisting it, we will pin the zip accurately to stitch in the following steps. 

The Barcelona dress has a 1.5cm SA so the tape of the zip will be narrower than your SA.Open the zip so the puller is all the way to the bottom. Start on one side of the zip, it doesn’t matter which side and place the top stop 1cm from neck edge. This is to allow space for the binding (I’ve placed a pin in the photo to show you where) and pin the tape to the SA. Keep the zip coil ON the CB stitch line. Once you have pinned one side of the zip mark on the zip tape the base of the opening so you know where to stop stitching. If you like you can also tack as close as possible to the teeth coil to hold in place.

Change to an invisible zip foot

 Take a look at your zip foot and you will see 2 grooves or channels on the bottom of your invisible zip foot –  yours may not look exactly mine but you’ll get the idea. The coils of the zip will sit in one of these channels dependant on which side you are stitching. Choose the groove furthest away from the SA and so that you are stitching through the zip tape right next to the coil.

Stitch with the dress RSU and start with a backstitch at the top of the zip. Stitch close to the zip coil and roll the coil with your fingers as you stitch so it sits perpendicular to the zip tape as you sew. Do not stitch on the coil as your zip will not close! Stop with a backstitch when you get to your mark at the base of the zip opening.

Mark the stripes

Close the zip. Now carefully mark the base of the opening, the waist seam position and the stripe positions on the tape on the other side of the zip with chalk, tacking thread or a fabric marker pen. Take your time and do this accurately as it will allow you to match the stripes across the zip. Then pull the zip puller to the bottom of the zip again.

Now to place the other side of the zip.

Pin the zip tape in the same way you did before, making sure the coil stays on the CB line (it will help if you marked your SA) and take your time to match the stripes and waist seam to your markings. Make sure you also line up the top stops on each side of the zip or it will look uneven and stepped at the top when it is closed. Use a small stitch and tack the zip tape and the seam allowance together as close to the coil as possible.

TIP: If you want to close the zip to check your stripe matching after tacking but before you machine stitch permanently, you will need to unpick the last few centimetres of tacking at the bottom of the zip to get the puller back below the zip opening before re-tacking that last bit again.For overkill, and because I still found that the stripes moved a smidge, I went back and added pins horizontally across the zip to stop any stripes shifting under the machine as I stitched. I removed these as I sewed.Start at the top again, with a backstitch, and stitch the other side of the zip using the other groove of your machine foot. Go slowly and stop and backstitch at your mark at the base of the opening.

Close the zip to check puller will run up and down and all looks good before continuing.

If any of your stripes have shifted or you caught the teeth of the zip you can always unpick just a section and re-stitch. But please remember that there is no such thing as the sewing police – if you’re happy to wear it, it’s good enough!

How to Shorten an Invisible zip

If your zip is too long, they are easy enough to shorten. Always shorten an invisible zip after it has been sewn in and when it is CLOSED!

First, we will need to create a new stopper at the bottom of the zip. Take a length of thread, double it and thread a needle with the folded end to give you 4 strands of thread to sew with.

Knot the end.Start from underneath the zip so the knot is hidden and about 1cm below the opening and whipstitch (oversew) around the coil of the zip. You are only sewing through the zip, not the garment. Do this a few times to create a stopper for the zip before securing your thread.

Leave about 3cm (1″) of tape below the stopper and then you just can cut off the excess zip.

I haven’t done it on this zip, but you can bind the end of the zip with a piece of ribbon or fabric. It looks tidier and helps stops the end of the coil catching and irritating anything.

Secure the zip

Change to an ordinary zip foot (sometimes called a half foot). We are going to anchor the zip tape to the seam allowance at the base of the zip. The point of this is to take some of the strain away from the zip when it’s being pulled up and also to stop it flapping around.

Machine stitch through the zip tape and SA by stitching forward and backwards a few times in a straight line on either side of the zip to create a bartack. You can either do a short run as in the photo, or stitch the full length of the zip tape to the seam allowance.

Make sure you are only stitching zip tape to SA and you are not stitching through the dress! 

You can anchor the zip to the seam allowance by hand if you prefer, in the same way, that you created a stopper.

Press. Give your zip a gentle final press!

Troubleshooting

It’s very easy to get carried away and obsess over the things we make and sometimes we just have to say that will do. And it will do, it really will!

But this was a problem I had and the solution wasn’t what I thought it would be, so on the off chance it helps here it is…

Now I’m sorry to say that I didn’t take a ‘before I unpicked it photo’, but those stripes on the skirt below the waist didn’t match. They weren’t out by a lot, but enough to be annoying. I assumed that I needed to move the stripes up or down the zip to get them matching to the other side. Once I had released that stitching I could see that I actually needed to move them to the right (the pins are my original line of stitching) and gain a few millimetres from the SA to get them to match. We had a saying in the Industry years ago – ‘wangle it’ which basically means can you bodge/fiddle something that should work, to make it work? So sometimes, when it’s necessary, we ‘wangle it’ and that’s OK.

So I moved those stripes across to where I wanted them and voila!