Posted on 11 Comments

Lengthen or Shorten a Sewing Pattern Tutorial

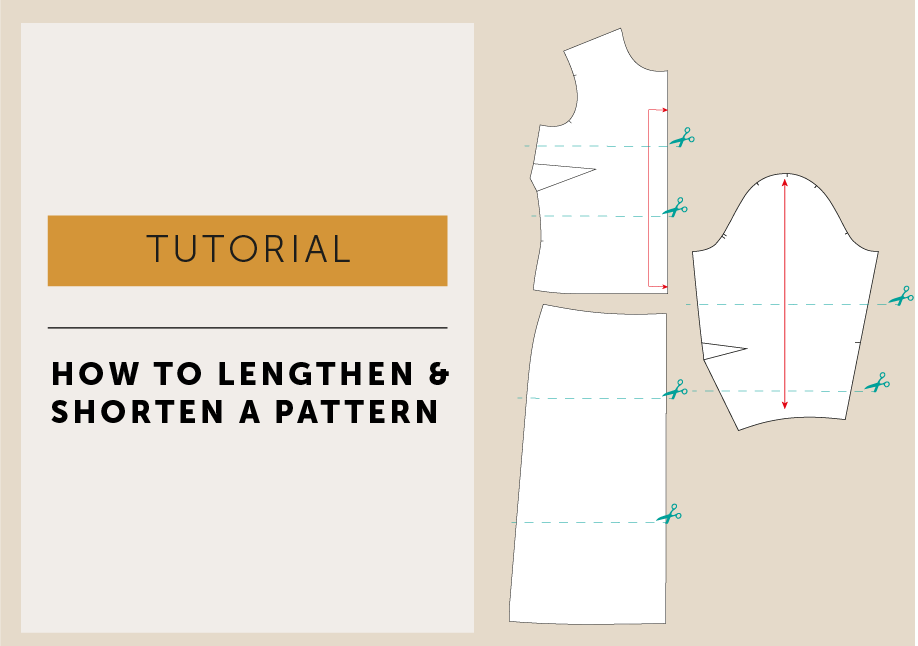
How To Adjust the Length on a Sewing Pattern

This is just about the easiest pattern alteration to do!

You’ve probably noticed, many patterns have horizontal length adjustment lines marked on them to show where to alter the length. I don’t do that on all of my patterns, I prefer a cleaner look. It’s so easy to get in a muddle with too many lines everywhere and so simple to mark any length adjustments only if you need them. This straight forward tutorial will show you how simple it is to lengthen or shorten a sewing pattern, to help achieve a great fit.

TOOLS

  • Your pattern (or copy of your pattern if you don’t want to alter your original)
  • ruler
  • pencil
  • tape
  • paper

Things to be aware of

  • If you are unsure of how much length to add/reduce or even if you need to adjust the length, make a toile first. The silhouette and ease in a garment can make a difference to how long it should be.
  • If you are doing lots of alterations to your pattern, do any length adjustments first.
  • Keep the grainline or “place to fold line” IN A STRAIGHT LINE, do not allow them to stagger.
  • The Chain Effect: when altering one pattern piece, also alter the corresponding pattern piece in the same way and remember to check they still fit together after your alteration. It is very annoying to end up with the front skirt longer than your back skirt!
  • A toile is always your friend if you’ve done lots of (any) alterations!

Step 1

HOW TO LENGTHEN OR SHORTEN A SEWING PATTERN TUTORIAL_MAVEN PATTERNS-01

Once you’ve made a toile, you’ll know how much and where you need to add or subtract length to your garment. You can just change the bodice length, or a skirt length or the sleeve, or all 3!

Draw an adjustment line horizontally across your pattern at a right angle to the grainline or to the “place to a fold line”

On a bodice: mark the line above the waist line but below a bust dart, and straight through any waist darts.

On a skirt (or skirt portion of a dress) below the hip line, but avoid any pocket details – no point making life complicated!

On a sleeve: half way along the underarm seam, unless it’s a fitted sleeve or has an elbow dart, then divide between two lines. (See “Good to Know” at the end)

Step 2

Lengthen a pattern

HOW TO LENGTHEN OR SHORTEN A SEWING PATTERN TUTORIAL_MAVEN PATTERNS-02

Cut along the adjustment lines and separate the pattern piece.

Place a piece of paper behind your pattern and tape the top portion of your pattern to it.

Extend the grain line. Draw a line parallel to the your adjustment line the amount you need to lengthen the pattern by. Tape the lower portion of your pattern to the new line, matching up the grainline. Re-draw the seam lines so that they match up again, these may need to be curved or may be straight depending on your pattern piece. It’s quite usual to need to blend the new lines together, adding a bit to one and taking a bit off the other.

Shorten a pattern

HOW TO LENGTHEN OR SHORTEN A SEWING PATTERN TUTORIAL_MAVEN PATTERNS-03

Cut along the adjustment lines.

Place a piece of paper behind your pattern and tape the top portion of your pattern to it. On your pattern, draw a line parallel to the adjustment line the amount the pattern is to be shortened. Overlapping your pattern pieces, tape the lower portion of the pattern to the new line, matching up the grainlines. Re-draw the the seam lines so they match up again, in the same way as lengthening a pattern.

Step 3

Check your pattern pieces still fit together before cutting out your garment. Toile again if you need to!

Good to Know

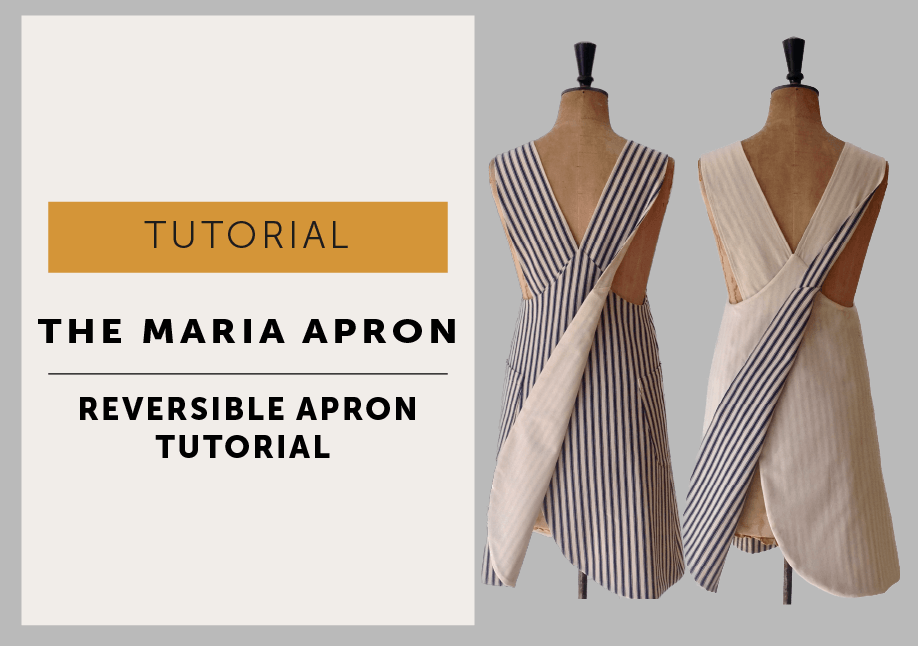
The Maria Apron: lengthen the straps

HOW TO LENGTHEN OR SHORTEN A SEWING PATTERN TUTORIAL_MAVEN PATTERNS-06

This is a great method to use if you need to alter the length of the straps of The Maria Apron too. Be sure to keep the grainline aligned as before, but you can just chop through the strap, spread the pattern the required amount and re-draw the edges with a straight line – all without changing the length of the angled edge that attaches to your apron! You will need to do exactly the same alteration to both the TOP and UNDER straps.

Changing the length by a larger amount

If you are lengthening or shortening a sewing pattern by a larger amount, you can spread the amount between 2 lines

HOW TO LENGTHEN OR SHORTEN A SEWING PATTERN TUTORIAL_MAVEN PATTERNS-05

On a bodice, for example, take the amount needed to lengthen and place half above the bust dart, and half below the dart, this will of course lower the bust dart a little, so be sure you want it lower!

On a skirt, especially a maxi skirt style, half could go through the skirt in two places, this will lengthen the skirt and keep the hem circumference the same as the original. Alternatively, use one adjustment line and extra length could be added straight to the bottom of the hem, but the hem circumference will get bigger.

For a fitted sleeve: Spread the amount between two lines one above and one below the elbow/elbow dart.

Now, do I always use this method for changing the length of every pattern?

I’m 5’2″ so it’s always shorten, shorten, shorten.

HOW TO LENGTHEN OR SHORTEN A SEWING PATTERN TUTORIAL_MAVEN PATTERNS-04

NOPE, I don’t! If it’s only a little bit, or a boxy shape I’ll just chop it off/add the extra on to the bottom of the pattern. That works just fine too in some cases.

I hope you found this pattern alteration tutorial useful, and now can confidently alter the length of your sewing patterns.

Posted on 2 Comments

The Original Maria….

MARIA THOMAS TEXTILES_MAVEN PATTERNS


MARIA THOMAS TEXTILES_MARIA WRAP APRON

This really is the most delightful Maria Wrap Apron I’ve seen. Let me tell you why…It’s made by THE actual Maria that the apron is named after! Oh, yes…my very inspiring friend Maria of Maria Thomas Textiles is a textile artist, screen printer and a very generous teacher. She wore the very first incarnation of the Wrap apron in her studio, where this image was shot, and you can see some of her work hanging behind her apron. As you can probably see, Maria works with found objects and recycled materials, often recanting the daily rituals of life within her work.

Her apron has been made from an embroidered table cloth, that she has rescued and hand-dyed indigo and given careful consideration to the placement of the embroidery. The edges have been bound as a facing wouldn’t have been a suitable finish in this case, and she has stitched all of that binding down by hand, because she is, in fact, a demon hand stitcher! She has worked with the fabric and squared off the back at the hem to make the most of the embroidered edge.

MARIA THOMAS TEXTILES_MARIA WRAP APRON

I met Maria by chance, our eldest children in the same year at school, me also with a 2-year-old in tow & Maria with one a year younger – we discovered we had a mutual love of denim and a hatred of cooking the tea so I think the friendship was meant to be! She talked me into doing a screen printing course that she was teaching, just 2 or 3 days, where we met Wendy (of the smock), who had coincidentally worked with my other friend from college that I had dragged along at the very last minute to cheer her up…funny how you meet your tribe isn’t it!? Well those 2 days, turned into a 4 year, 1 day a week print course, a couple of exhibitions and some very good friends. She is also the reason why I have paper spoons hanging in my kitchen, the occasional hangover, more fabric than is strictly necessary and the knowledge that making stuff is a way of life and I didn’t know I was missing it. Like I said…good friend.

MARIA THOMAS TEXTILES_MARIA WRAP APRON

Maria is currently working on her next exhibition and will be at the Sewing for Pleasure show at the NEC in Birmingham, 17-20 March 2016 where you’ll be able to chat to her about her art, her inspiration and find out more about the amazing workshops that she runs.

Work from a previous Maria Thomas Textiles exhibition, nothing to do with me…I just wanted to share it! Now go be inspired!

Maria Thomas Textiles

Maria Thomas Textiles


Maria Thomas Textiles: The Blog

Maria Thomas Textiles: Facebook

Posted on 18 Comments

The Maria Wrap Apron Reversible Tutorial

How to Make a Reversible Maria Apron

I’ve seen some lovely reversible  Maria Wrap Aprons appearing by way of the growing band of happy #mavenmakers. I’m so delighted to see your makes and you’re a very creative bunch!

I’ve had many-a-request for a tutorial of how to make a reversible version. It’s not too complicated, and as with most things there is always more than one way to do it, but this is the method I found the easiest.  Do feel free to share your process…I’m all about an easy make!

The Maria Wrap Apron Reversible Tutorial

Arm yourself with the original instructions – to keep this tutorial shorter you’ll need to refer back to them for the full maker instructions.

Be sure to use the seam allowances as stated in the instructions.

CUTTING OUT: we are making Version A of The Maria Apron in this tutorial.

  • Use the FRONT (pattern piece 1)
  • BACK (pattern piece 2),
  • POCKET (pattern piece 7) 
  • TOP STRAP PATTERN (pattern piece 3)
  • DO NOT cut understraps or facings.

CUT 1 set for body A in fabric choice 1 (I’ve used a striped ticking from Ditto fabrics)

Cut 1 set for body B in fabric choice 2 (ideally equal in weight and density to fabric A, so one fabric doesn’t show through the other when reversed.)

*Please forgive my fabric choice 2…I’m currently working on a ‘use fabric from the stash policy only’ or I end up wasting days looking for the ‘perfect’ cloth. So my reversible apron is less reversible, more lined and without pockets in calico.

FACINGS: do not cut in fabric, ONLY cut 1 set in fusible interfacing (I made mine 2cm narrower than the pattern)

UNDERSTITCHING: in the instructions when it tells you to understitch, DON’T – doesn’t apply to a reversible one.

OVERLOCKING/NEATENING OF SEAMS:  They’ll all be enclosed between the two layers so don’t bother. YAY!

Don’t forget to press as you go, that’s my very TOPPIEST TIP for a professional looking garment.

Test your topstitching tension, it’s going to need to look good on both sides of your garment.

STEP 1: INTERFACING

Maven Patterns: The Maria Wrap Apron reversible tutorial

Fuse the interfacing onto the wrong side of one of your fabrics, doesn’t matter which one, but I’d advise doing a little test first to make sure it doesn’t show through on your fabric (it really showed through on my calico).

Follow the instructions and make up bodies A + B of the Aprons, complete with pockets. Don’t overlock or neaten the seams, they’ll all be enclosed so as I said before, there is no point!

STEP 2: MAKE THE STRAPS

Maven Patterns: The Maria Wrap Apron reversible tutorial

Make up the straps (one A + one B for each strap) and turn through. This is where we deviate from the instructions…don’t understitch the straps. Normally you’d want those seams to sit to the underside of your strap (that’s why there is an understrap pattern, it’s slightly smaller so the seams roll to the underneath) but as we are doing a reversible one it needs to look good from both sides, so our seam is now going to sit exactly on the side, neither to the front OR the back. Practise on your straps – you’ve got to do the same on the armhole in a minute. Topstitch your straps, neatly does it, remember it’s going to show on both sides.

STEP 3: ARMHOLE

Maven Patterns: The Maria Wrap Apron reversible tutorial

Place body A + body B with RIGHT SIDES TOGETHER (RST), use a 6mm seam allowance and stitch together at the armholes only. Turn back to the right side, so the seam allowance is enclosed and press.

STEP 4: ATTACH STRAPS 

Follow the instructions and attach the straps to body A. Just check they’re correct before you continue, you’ll thank me if you’ve got it wrong. All good? Great, let’s carry on then…

STEP 5: FRONT NECKLINE

Maven Patterns: The Maria Wrap Apron reversible tutorial

With RST pin and then stitch A + B together. Cut off the bulk in the corners (as described in the instructions), turn back to the right side and press neckline flat.

STEP 6: BACK AND HEM

Maven Patterns: The Maria Wrap Apron reversible tutorial

With RST again, pin the backs together at the top edges (where the straps are placed) and then continue to pin down the back and all around the hem, make sure you line up the side seams.

Here’s the (not-so) secret to bagging out a fully lined/reversible garment, leave an opening to turn everything through – you are literally going to pull the whole apron through it after stitching to turn it to the right side. If you are just lining a garment (rather than making it reversible) I’d suggest leaving an opening on the side seam as it won’t show at all when you are wearing it. But, as this is reversible and has pockets that sit over the side seam, I’ve gone with leaving an opening on the back seam. It’s a personal choice thing…I could have just as easily left an opening at the hem.

Machine stitch A + B together, use the seam allowances stated in the instructions. Don’t forget to leave the opening on one side – mine is about 12cm long. Press your seam.

STEP 7: TRIM & PRESS

Maven Patterns: The Maria Wrap Apron reversible tutorialTrim away the excess seam allowance at the hem and around the curve so it will lie flat when turned through to the right side.

Turn the apron to the right side by pulling it through the opening. Now take your time and press the seam where you have joined A + B together, again you want that seam to sit exactly on the side so it neither favours A or B.

STEP 8: FINISH!

Maven Patterns: The Maria Wrap Apron reversible tutorial

Close the opening with a slip stitch, you shouldn’t be able to see your stitching when you’ve finished. Now you can topstitch around your Apron (all in the instructions). Personally, I left that stage off…

A: because I liked the look of my apron without it and

B: because my machine was in a bad mood, and I hate ropey topstitching so quit while I was ahead.

So that’s it, a fully reversible (or just fully lined) apron!

Off you go then….get stitching!

Posted on

Instagram first for Maven!

#mavenmakers Salt_of_the_North

#mavenmakers Salt_of_the_North


I’m so excited to share this with you all…The first Maria Wrap Apron has appeared on Instagram! YAY!!

Maddy posted her apron on her lovely Instagram Salt_of_the North. She has made such a beautiful job of this one. I was very intrigued to see she is going to add some red line embroidery to the front, I can’t wait to see it completed. I just love the idea of everyone personalising their Aprons.

You should go and check out Salt_of_the North, it’s a wonderfully curated collection of images – very inspiring. A big thank you to Maddy for sharing her apron and I hope it’s not too long before her dream of being a shepherdess is fulfilled!

Don’t forget to add your own Maven Makes to Instagram by tagging us @mavenpatterns and with the hashtags #mavenmakers #mavenpatterns