These are the last posting dates from Royal Mail for Christmas 2023. Place orders before 12pm to be included in that days shipping.
Please do place your order as soon as possible as these dates should allow enough time for delivery but they are not guaranteed and we all know how the post gets at Christmas!
UK – We use the reliable Royal Mail 48* service, which typically delivers within 2-4 business days after shipping. *Please note that some goods may require alternative Royal Mail services.
EUROPE – We use Royal Mail International Tracked Service. We expect your order to be delivered in 5-10 business days after shipping.
REST OF THE WORLD – We use Royal Mail International Tracked Service. We expect your order to be delivered in 9-12 business days after shipping.
Monday 11th December – Australia and New Zealand
Wednesday 13th December – USA, Canada most of Europe
Monday 18th December – UK
We will continue to post out after these dates until we close for the mince pie season.
For any last-minute presents I can recommend a PDF pattern for instant sewing JOY!
OPENING HOURS – 20th December to 3rd January
We will be enjoying the festivities as a family over the Christmas and New Year period so there will be a very reduced customer and pattern support service during this time. I’ll be checking on things every few days but please be patient.
Until then, my friends, we wish you a peaceful Christmas & New Year.
Today is all about the wonderful pattern testers that took the time to make and share their thoughts on the new extended size range for our French Dart sewing pattern.
It’s been a little while in the creating but The French Dart is now available in our new extended size range of (UK) 18-32. Hurrah! The Rochester and The Somerset patterns will be released in this new size range in the next few weeks.
As always I’ve given a lot of care and thought to these patterns. We’ve had them re-drafted and graded by a professional pattern house who have a lot of experience in plus size patterns having originally created the patterns for Dawn French’s range, and worked with a professional fit model to for several fittings to ensure the new blocks were up to Maven standards.
And then it was time to ask for help with a wider testing group. I must admit I was quite taken back with all the responses to the original tester call out – I really hadn’t expected so many. The generosity and patience of the sewing community really is something to behold and be part of!
With some difficulty I narrowed down to a few testers who were all wonderful! Understandably, not everyone wanted to be public or share photos outside of the test (that wasn’t a requirement of testing) but I do have permission to share these beauties, some of which are toiles / wearable toiles / early versions but already much loved.
Shelley chose a gorgeous printed satin for her French Dart and made version C with a Bishop Sleeve. I’m totally in love with this version and this print!
Helga made 2 wonderful French Darts. The first was a toile in an Ikea print and the second was the cap sleeve version.
“I am thrilled to be able to sew the lovely French Dart dress from Maven Patterns. It has been on my list for a while. When extended sizes where introduced, I knew I was finally going to get to sew one. The pattern is incredibly well drafted. For someone like me, who loves to follow instructions, it was flawless. The fit is lovely. That collar is my dream! Who knew a French dart could give such lovely shaping! I hope to make a cap sleeve tunic for over trousers, and a bishop sleeve dress for our harsh Canadian winters.” Helga
I’m sure many of you will know Corrie from Instagram as her ceramic jewellery is now quite legendary in the sewing community! Corrie used a slightly stretchy cotton and left out the back darts for this French Dart.
“A timeless garment that works across seasons and personal aesthetics. Layering with heavy boots for winter and bare legs for summer. The French Dart Shift will fit into anyones wardrobe effortlessly.” Corrie
Heike made version B with the cap sleeve in a glorious yellow viscose-linen
“The French Dart Shift Dress is a very versatile garment. Comfortable, smart casual. Many types of fabric can be chosen, the pattern/dress is suitable for a summer as well as winter dress. I love the adjustment tips given on the website. With these tips the French Dart Shift Dress will be perfect for ervery body shape. I will definitely sew many more dresses with this excellent pattern and I am looking very much forward to receiving totally different looks with it.” Heike
Gilly made 2 wonderful French Darts and the first one is lined using our Lining tutorial.
“This is my first time testing a pattern for a designer & I was thrilled to be selected to sew the French Dart (FD). I’ve wanted to sew this for ages but to be honest, standard sizing & the need for a full bust adjustment had put me off. I decided to sew a couple of toiles first using a duvet cover because I had some gorgeous material lined up for my final lined version, I decided to try out both short & long bell sleeved versions. I kept closely to Maven sizing against my fluctuating measurements, the main adjustment was grading out the pattern at the hip. I am so pleased with my final fully lined FD, & will be going back to adjust my first toile which I made too large – based on original measurements. I will also re-sew a short sleeve for my second toile which is already cut out. I will also shorten the length on one of them to wear with trousers/leggings in autumn. They were a dream to sew as I used Maven’s tutorials throughout. I had never sewn a Maven pattern before & the tutorial were so helpful, I will use Mrs M’s techniques on other makes. I especially want to shout out the updated inseam pocket and lining tutorials. I can see that this pattern will become a favourite for me, I’d like to try a bound neck version next.” Gilly
Lone & Lykke / The Sister Act!
I was so happy when sisters Lykke (@Lykkenernu) & Lone (@lonekyllesbech) took part in the test together – such a fun idea!
Lou /@loudelve
Lou made this gorgeous wearable toile in Ankara fabric.
“I was so happy to be chosen to test this pattern. I would always look longingly at the pattern but it was out of my size range, until now! I loved making this up. It was quicker than I imagined and i will definitely be making more. It has clear instructions and pattern pieces. Thank you for Extending the size range!! The fit is really good and corresponded to my measurements. I thought i would have to make some adjustments, but not at all.” Lou
Ysabel
Ysabel made the cap sleeve version in a linen, which is always my favourite fabric for a French Dart! And who doesn’t love a close up pic of such beautiful stitching!
“I made a super simple version of this dress: ochre linen, cap sleeves and a bias neck. I’ve worn this dress 3 times so far, and every time someone has paused our conversation just to remark how much they love the dress. This is one of my new wardrobe staples and I can’t wait to make a funkier version in the future.” Ysabel
And a final thank you to my other testers that have chosen not to be included in the round-up but their contributions are equally valued!
Learn how to sew Bias Binding with our bias binding tutorial. How do you sew bias binding neatly on curves, corners and garment edges? This comprehensive bias binding tutorial covers everything from making and joining bias strips to attaching binding cleanly with smooth, professional results. Whether you’re finishing necklines, armholes or raw edges, you’ll learn techniques that help bias binding sit flat, feel neat and add a beautifully finished detail to your sewing projects.
Bias binding is a great way to finish the raw edge of a garment. It is hugely versatile and can be used on necklines, armholes, hems, pretty much anywhere really. You can buy ready made binding from your local haberdashery shop or make your own and use up some of those scraps.
There are really two types of binding for our purposes:
DOUBLE BIAS BINDING is on show from the right side of the garment and can be decorative if made in a contrasting fabric.
SINGLE BIAS BINDING: It can be used in lieu of a facing on an armhole or neckline, and apart from a row of topstitching, only be seen on the inside.
Prepare the Binding
If you are using a Maven Pattern, I always include a pattern piece for each bias strip needed so just use that and be sure to follow the grainline as it must be cut on the BIAS GRAIN of your fabric.
How to cut your own bias binding
Your strips need to be cut on the bias grain of your cloth, so they will stretch around curves (armholes, necklines etc) and lay flat once stitched.
(There are times to use binding cut on the straight grain, usually for the edges of quilts, but if in doubt cut on the bias.)
TIP / If my fabric is a little unstable I’ll either tape it to the table to stop it moving, or pin the fabric to paper, at the marking stage before cutting the strips.
First you will need to find the TRUE BIAS (often just referred to as the bias grain) of the fabric. The bias of the fabric runs at a 45 degree angle to the lengthwise grain (along the selvedge) and the crosswise grain (the width of the cloth).
To find the true bias: square off one end of your fabric. Fold the fabric diagonally so the crosswise grain is parallel to the selvedge/lengthwise grain (forming a triangle shape as above). Press the fabric along this fold to mark the bias grain.
Open the fabric out and using your pressed line as a guide, mark out your bias strips to your desired width, keeping them parallel to your fold line.
Your strips need to be 4 times your finished width, I usually find cutting 4cm wide for a finished binding of 1cm works well. Cut as many bias strips as you need to complete your project. You can mark with a fabric marker pen, but if you are careful and mark on the reverse of your cloth, I’ve found a pencil or ballpoint pen works well as they give an accurate line and you don’t lose your marks too quickly. Do make sure you do a test first!
Join
To join to ends of binding together (or separate pieces if you need a long continuous strip)
Lay your binding strips on top of each other with Right sides together and at 90 degree angle to each other.
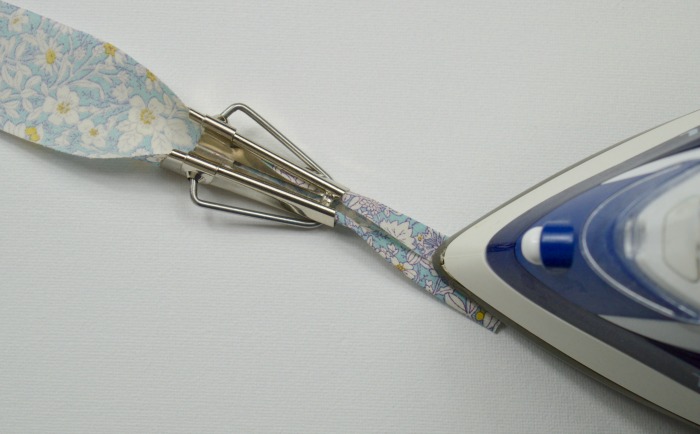
Stitch across the diagonal to join as shown in the picture.
Trim away the excess to leave a 6mm seam allowance and press this seam open.
To finish the sleeve hem on The French Dart Shift Dress, or to bind an armhole, you will need to make a loop of binding as above.
I like to join first and then press my bias strip into binding. I use a sleeve board at the pressing stage to help so it’s not too fiddly. That is just a preference, you may find it easier to fold press your binding first and if you are using a BIAS TAPE MAKER TOOL you will need to make your binding and then join it.
Alternate joining/ finishing method
This is an easy way to join your bias binding, especially if you are not sure of your finished measurement so can’t pre-join together before stitching to your garment.
Fold back starting edge by 1cm to wrong side of binding and then pin binding into place aligning the raw edges of garment with the raw edge of the binding and with right sides facing together.
Continue to pin binding along edge of garment, and then at the join lay the binding directly on top of your starting point and trim so that it overlaps by 1cm.
Stitch into place and finish as described in the ” How to sew bias binding instructions below”
You will create a neat little overlapping finish. It is suitable for many fabrics but you may find this method a little bulky for thicker ones – then it is preferable to use the diagonal stitch method discussed above.
How To Sew Double Bias Binding
Press
Now you’ve cut your binding and if necessary joined your binding, it’s time to press your strips so they look like binding.
Take your length of binding, fold in half and press. Unfold and refold each outside edge to meet your centre fold and press.
Fold it all back together and press flat firmly but don’t stretch it.
Alternatively use the handy BIAS TAPE MAKER gadget.
The handy little gadget that is the bias making tool can be incredibly useful, especially if you are making a lot of binding. Just pull your pre-cut binding through the tool and it will fold it ready for you to press into perfect binding. They come in different sizes, so you can just pick the one that will give you the width you want.
If you google how to sew binding you get 833,000 results. This is my way, feel free to tweak and find what works best for you.
Take your prepared binding and pin RIGHT side of binding to the RIGHT side of garment aligning the raw edges together. Machine stitch along the fold.
TIP / if you are binding a thicker fabric or a few layers of fabric, take a smaller seam allowance so you have extra binding where you need it to help accommodate that extra bulkiness.
Press binding AWAY from the garment.
Wrap binding over to the raw edge to WRONG side of garment, and position the folded edge of binding so your machine stitching is covered by a few millimetres. Pin to hold. Tack right on the edge of the binding to hold into place – ensure you catch all the binding on the reverse side and just cover the machine stitch while keeping an even distance away from the binding on the front. Take your time to get this right now, the tack line will be a guide to your topstitching.
Two options to finish bias binding
OPTION 1 / EDGE STITCH ON THE BINDING
Top stitch the binding to finish: with the right side of your garment facing you, edge stitch on the binding and as long as you stitch to the inside of your tacking stitch and you know you’ve caught the back of the binding!
OPTION 2 / STITCH IN THE DITCH
If you don’t want your stitching to show on your binding try this method and finish your binding by stitching in the ditch (also known as sink stitch).
‘Stitch in the ditch’ is a really useful technique to know, good for finishing waistbands as well as bindings and also the neckline of The French Dart Shift . When stitched in the same colour as your main fabric the stitch line practically disappears as it settles into the seam.
Position your machine needle in line with the groove (the ditch) of the seam, you are going to stitch right in that ditch, NEXT to the binding but not on it. And as long as you stitch to the inside of your tacking thread, you know you’ve caught your binding on the back 🙂
Just remove your tacking thread, and you’re done.
And yet another way to attach binding
There is yet another way to attach bias binding to finish a raw edge! This way was shared with me by Shelley, one of my lovely testers of the new Maven1832 sewing patterns. Shelley was making the French dart with the bishop sleeve in a slippery fabric and found this was an easier way to attach the binding at the cuff.
It’s pretty similar to the above methods, except you attach to the wrong side of the fabric and flip binding to the right side of the fabric and stitch. This method only works with visible edgestitching but you might find it less fiddly if you are working with a tricky or slippery fabric.
It’s really a personal preference which way you prefer to sew your binding, but it’s always good to have more than one way to stitch something. Different fabrics do sometimes require a different method!
METHOD
Place the right side of binding to the wrong side of fabric and stitch in the fold to attach.
Fold binding over to the Right Side so all the raw edges are enclosed and the stitch line is covered. You can trim the seam allowance down a smidge if the biding doesn’t quite cover the stitch line.
And then, with the Right Side Up facing up, edgestitch the binding in place.
How to Sew Single Bias Binding
I love sewing binding this way. This is the method I was taught by a sample machinist I worked with about 20 years ago, she called it the Cheat Method.
It’s a really nice way to finish a raw edge on a neckline or armhole without using a facing.
Press / Fold your binding in half and press.
Attach / Line up the raw edges of your binding with the raw edge of your garment, with right sides together.
Stitch with seam allowance to attach.
Press binding and seam allowances away from garment. Understitch (machine stitch an edge stitch through all the layers on the binding close to the seam.) The understitching makes the binding roll to the inside better and I think it makes the binding stronger and less prone to fraying after repeated washing and wearing, especially for finer fabrics. Tack along the edge of the binding to hold in place, this will also give you a guide line for your next row of stitching.
Flip your garment over and topstitch with the right side up. If you stitch inside your tacking line so you know that you will catch all the binding!
(You can make narrower binding if you prefer…simple bit of maths… finished width of binding + seam allowance, x 2 = cutting width of binding.)
I liked the method because it was quick and that binding NEVER frayed no matter how much I washed those garments (kids clothes), must have been the combination of a folded edge and the extra understitching – great for linen fabrics. I’ve used this many times over the years instead of a having a flappy facing. The only drawback is some fabrics are just too bulky, but just use a contrasting fabric to bind those and make a feature of it.


 1980s Diamanté Collar Tips / Vintage BroochPrice range: £9.50 through £18.00
 Red Faux Leather Wiggle Braid£3.75
 Guipure Lace Trim – navy/off white£3.75
 5 Haberdashery Boards£10.00


