
How do you do a bicep adjustment so sleeves fit comfortably without pulling or feeling too tight? In this tutorial, we show you how to alter the sleeve pattern to add extra room through the upper arm, while keeping the armhole and overall shape balanced. It’s a simple pattern adjustment that makes a big difference to comfort and fit, especially for fitted sleeves in woven garments.
What’s a bicep adjustment I hear you ask? Because it sounds painful. It’s not, no biceps were harmed in the making of this tutorial.
So the question is, how are your sleeves fitting? Is your sleeve a little snug and restrictive at the upper arm, or is it a little bigger than desired? But it’s actually a good fit in the armhole.
Well, here’s the answer to your pattern alteration prayers. The Bicep adjustment tutorial. A pattern alteration to help you get a better fitting sleeve without touching the bodice armhole.
Bicep adjustment – The rules
We are going to cut up the pattern so;
RULE NO 1 OF PATTERN ALTERATIONS: DO NOT DESTROY YOUR ORIGINAL!
Trace off your pattern (unless it’s a PDF – you can always print another – hurray for technology!). If it all goes horribly wrong, you’ve just wasted a bit of paper and time – you can then just start again and have another go. It’s also a very good habit to date your pattern alterations, you can easily keep track of your latest version that way.
RULE NO 2: THIS ALTERATION ONLY REALLY WORKS FOR CHANGING BICEP MEASUREMENTS TO A MAXIMUM OF 2.5CM (1″)
RULE NO 3: TOILE, TOILE, TOILE. Don’t even think about mucking about with a sleeve without testing it out!
RULE NO 4: RULES ARE, sometimes, MADE TO BE BROKEN (except rule 3 – just don’t). There’s more than one way to do anything and you could also need a combo of alterations.
HOW MUCH IS ENOUGH?
First, you need to know how much extra to add. Measure your arm at the fullest part with your arm bent. Measure your pattern (without seam allowance) at the bicep (see below for the bicep line) and compare. The difference is the ease.
As with all things, how much ease you have in your pattern is going to depend on your fabric and how you want your garment to look and feel. There isn’t a one size fits all solution but a good guide is 4-5cm (1.5″ to 2″) should be enough for a woven dress, around 10cm (4″) for a coat to be worn over other garments. And then there’s jersey. Depends who you talk too – some say no ease, so the pattern is the same measurement as your body. Some say add 2.5cm (1″) ease. Some patterns have negative ease they are actually smaller than your body (very stretchy cloth!). With jersey fabrics consider how tight do you want the bicep area and how stretchy is your fabric as a starting point.
STEP 1
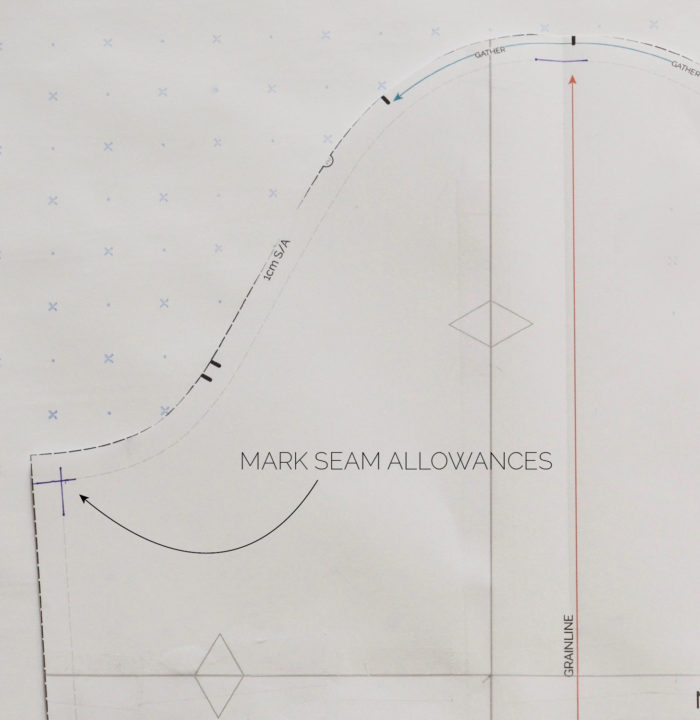
Mark the seam allowances. You can mark the whole pattern piece but you can just do each intersection: at the underarm, sleeve head, hem.

STEP 2
Draw a horizontal line joining the underarm points together, this is the BICEP LINE. Halfway along the bicep line (fold the pattern in half to mark it) draw a vertical line at a right angle to the bicep line the entire length of the pattern. It should be parallel (or in the same place as) the grain line.

STEP 3
Cut along the lines up to the seam allowance (NOTE: I’m using the Kitty sleeve pattern that has no hem allowance as it is finished with a binding, so I’ve cut straight through).

TIP / I like to work with a larger piece of paper behind my pattern piece and then on it draw a horizontal line (for the bicep) and a vertical line (the dashed orange lines above). It’s a good guide to make sure your sleeve pattern stays square and doesn’t go skew-whiff! Some cutters don’t do this and are happy to just slide a piece of paper behind the pattern and tape in place to fill the gaps later. Each to their own, neither is right or wrong, as always pros and cons for either!
STEP 4
Snip from theoutside of the pattern, back toward the seam allowance, leaving 2mm of paper, to make a hinge to help pivot the pattern. They do rip apart, it’s not a big deal, just use pins or tape to anchor in place as a backup/alternative to help when pivoting the pattern into position. The large piece of paper is handy to pin to.
NOTE / All the pivoting will be done from the SEAM ALLOWANCE line, not the outside edge of the pattern.
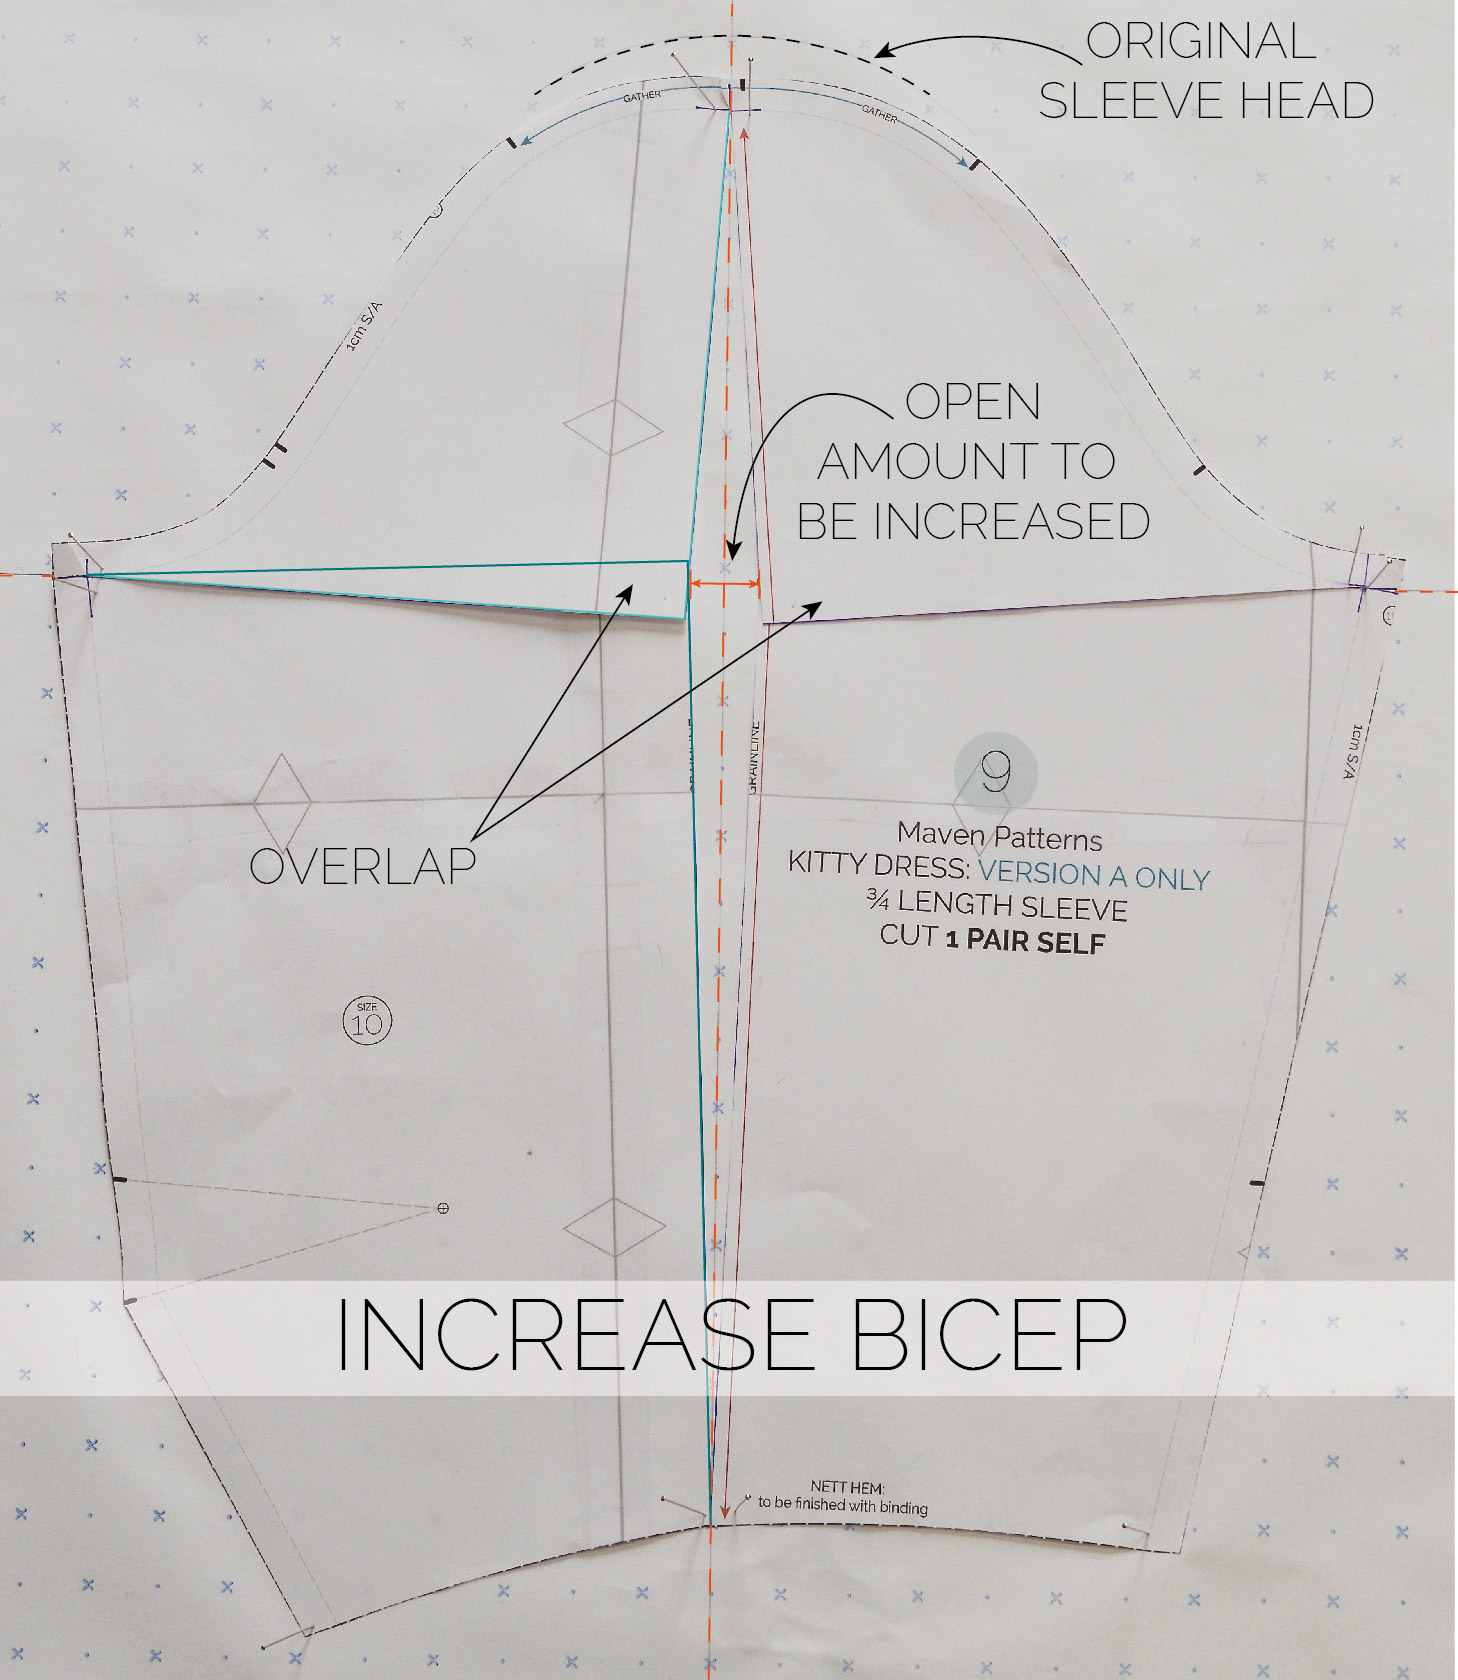
TO INCREASE THE BICEP
Mark the amount you want to INCREASE the bicep by on the bicep guideline, either side of the vertical line. (I’m going with 2cm = 1cm each side of the line)
Line up the sleeve with the guidelines and then gently slide the underarm points outwards along your guide bicep line until you have gained the extra you need in the middle of the pattern. Anchor them down with a pin or tape.
The hinges will help pivot your pattern into place, keep the hem and sleeve head on the vertical line. As the bicep gets wider, the sleeve head will automatically lower and overlap the lower portion of the sleeve. Crucially, the sleeve will still fit into your armhole because the sleeve head is the same measurement. You will probably need to redraw the sleeve head and hem to smooth the line. (See short sleeve picture below).
When you are happy, tape your pattern back together. You can just tape in that new extra bit in the middle and cut away the excess, or trace off the whole new pattern piece.

Close up of one section. You can see how the pattern spreads, raises in the centre and lines up with the guidelines.
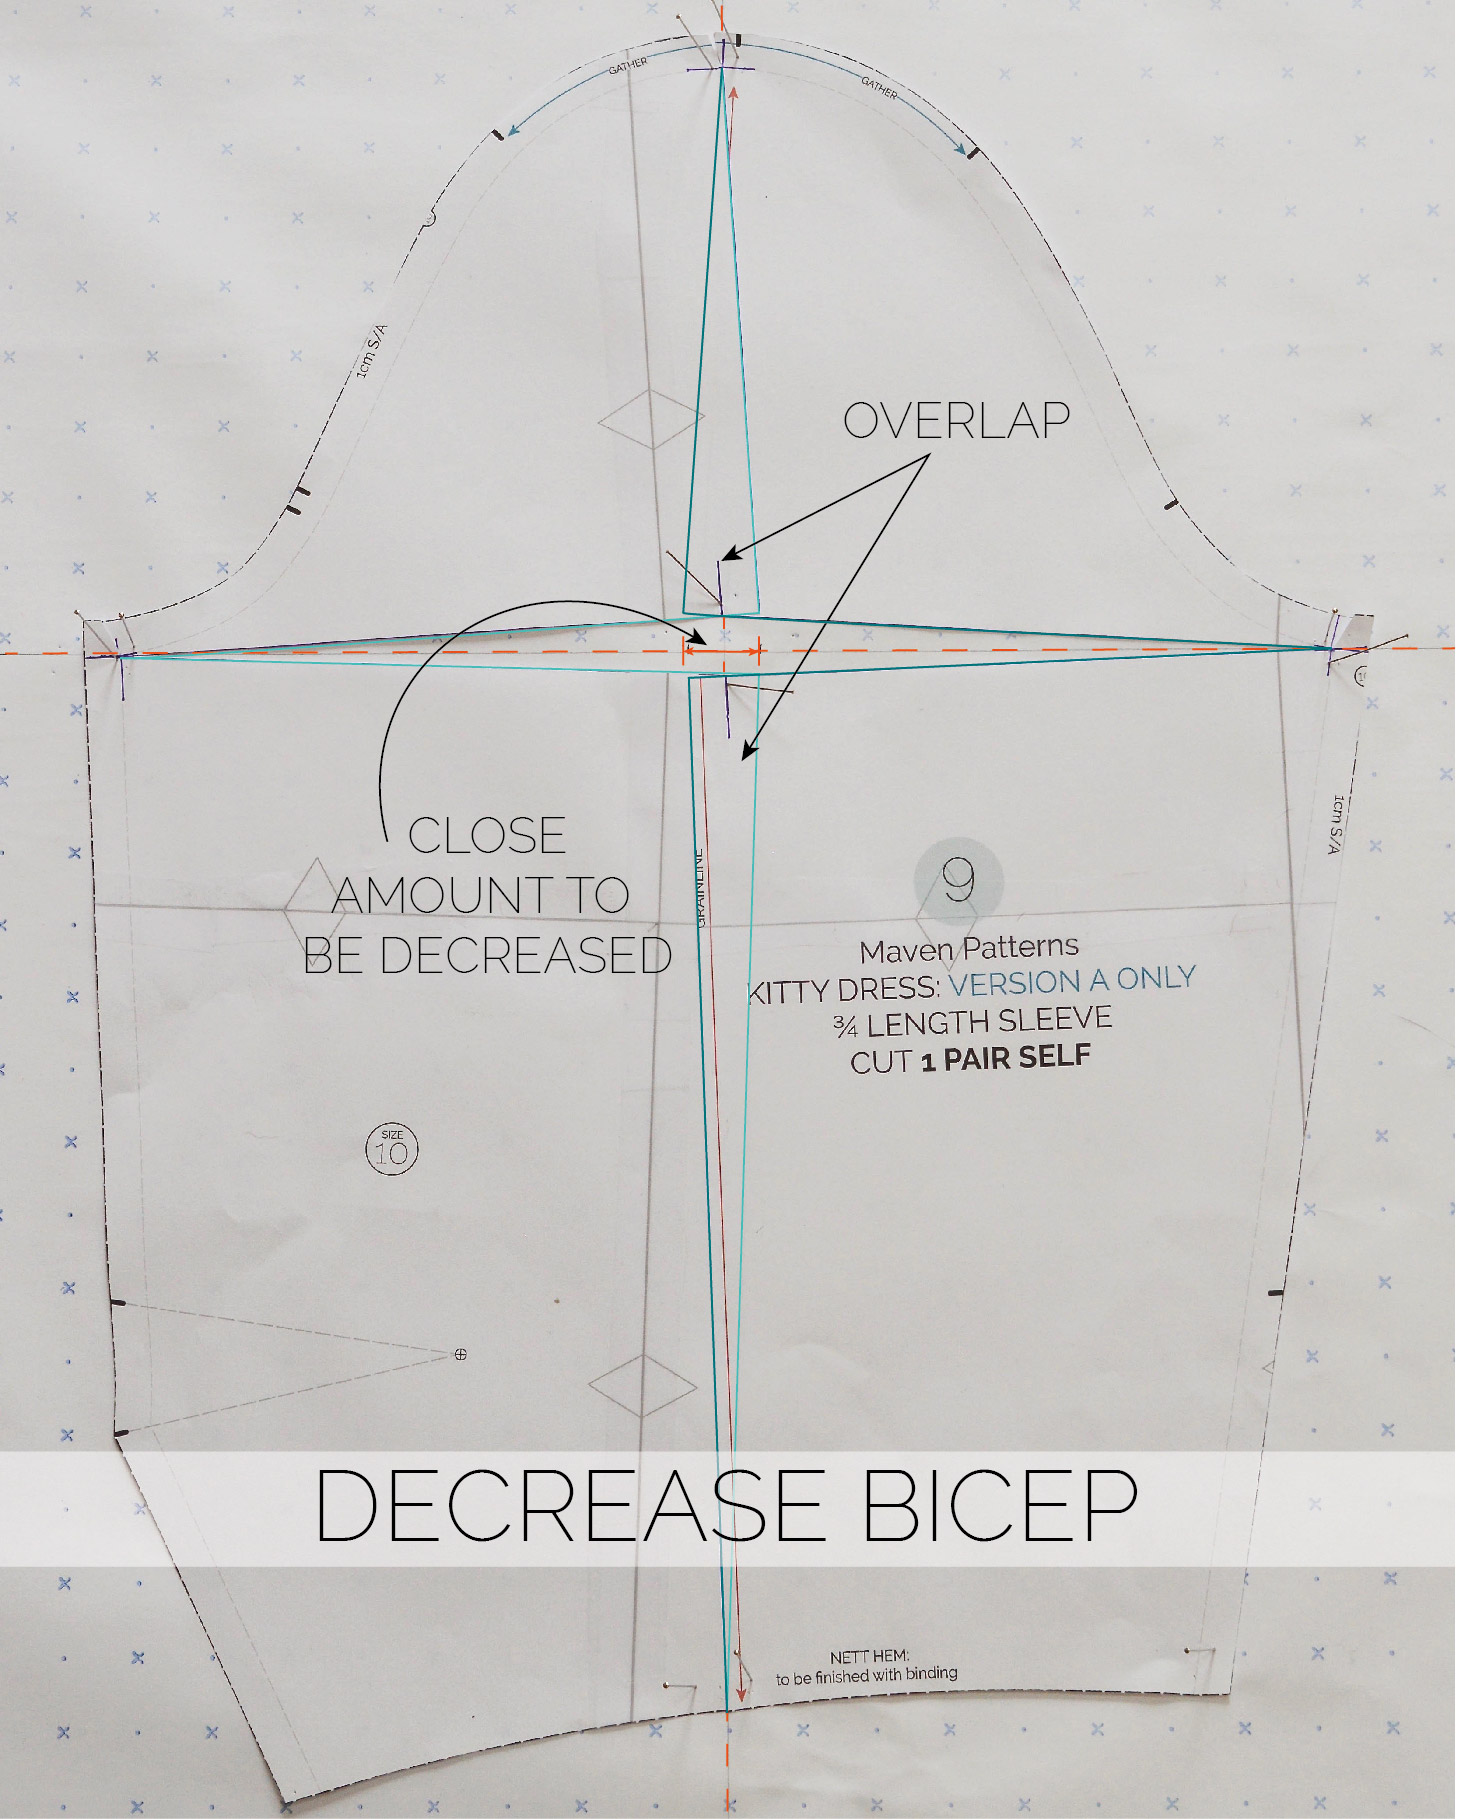
DECREASE BICEP
This uses exactly the same principle as before. We just decrease the bicep measurement by OVERLAPPING the pattern at the centre, rather than spreading it apart.
When you decrease the bicep measurement, the sleeve head raises in height. Redraw the sleeve head and hem to smooth if necessary. Tape back together or trace off the pattern.
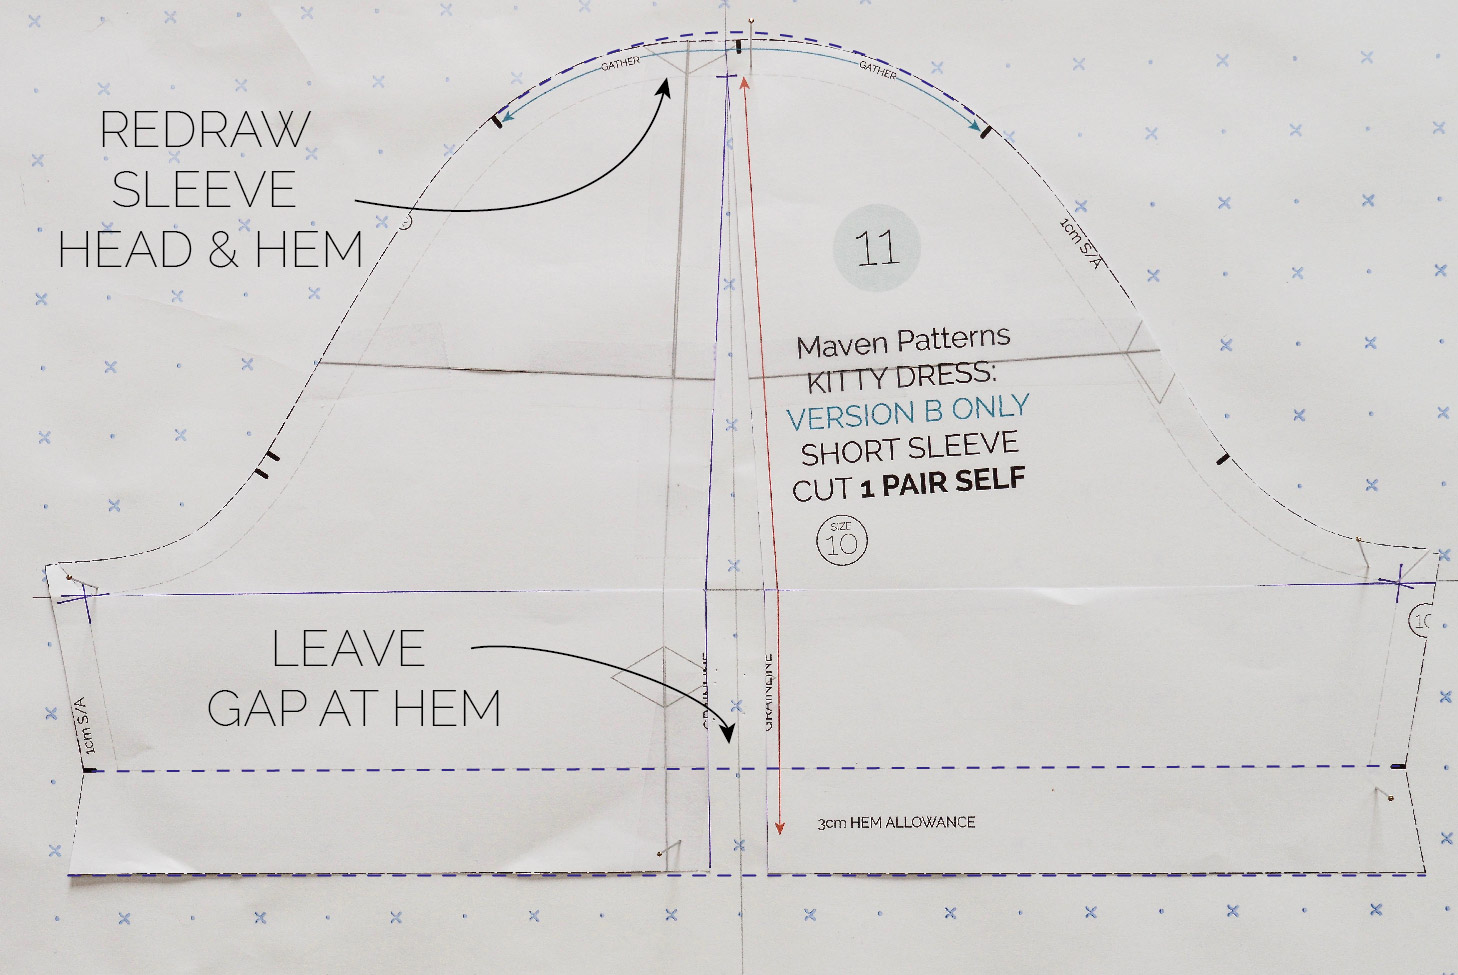
SHORT SLEEVE
Add to your bicep measurement in exactly the same way as the long sleeve. At the hem, you need to cut through and leave a gap to allow for the extra ease. Mine is pretty much parallel all the way down from the bicep, as I wanted to keep the underarm seam at the same angle. You can also see how I’ve redrawn the sleeve head and hem, it’s not a lot, just enough to create a smooth line.
RESULTS
So now you have a new sleeve pattern, with an adjusted bicep. You need to toile (make a test) now, just check it’s working for you. You may need to tweak and add or reduce the bicep again.
More to Sew …


