


Coming soon….the Rochester top & dress sewing pattern!
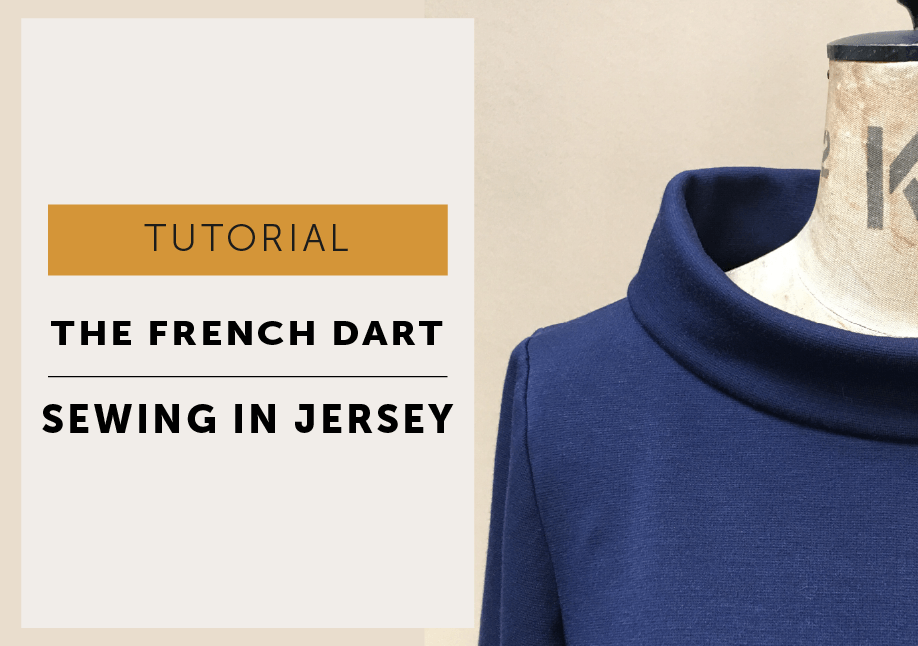
Can you sew the French Dart Shift in jersey instead of woven fabric? Yes, and this post explores how using jersey gives the pattern a softer, more relaxed feel while keeping the clean silhouette that makes the French Dart so wearable. From choosing the right knit fabric to thinking about fit, stretch and finishing techniques, we share how this simple pattern adapts beautifully into an easy everyday piece that feels comfortable, modern and surprisingly versatile.
SEWING THE FRENCH DART SHIFT IN JERSEY
I may have mentioned I like to get some mileage out of my patterns and when I was asked about sewing The French Dart Shift in jersey, a Ponte Roma knit to be specific, I thought let’s see! (And Elfi did make a rather splendid jersey one.)
A few things to remember…
Firstly, this pattern is not designed for a jersey. So the darts are staying and the knit fabric is more for cosiness and comfort, rather then body con type fit!
Second point…I bought this Ponte online and I’m not a huge fan of it. It feels very acrylic-y but for a toile type garment, it does the job. This particular Ponte reminds me of my girls’ school uniform sweatshirt fabric, although it actually sewed up quite nicely.
I chopped my dress pattern shorter (by 12″) so it would be a hip-length top without pockets and made with a 3/4 length sleeve (tutorial here). I had ideas of looking Audrey Hepburn-esque. I stitched the hem in red so it would show up, but school uniform Ponte combined with red stitching actually makes this top look less Audrey in Paris and a little more like British Airways crew outfit. Enough of the styling tips and on with the tutorial…


There are a couple of options for stitching your seams.
Refer to your Maker Instructions for detailed descriptions of general methods.

Pre-wash and press your fabric, lay up and cut out carefully.
The collar would normally be cut on the bias for a woven cloth. For a knit fabric cut instead on the straight of grain with the shortest edge of the pattern parallel to the selvedge.
Tape the neck as described in your FDS Maker Instructions. (This style has a wide neck and we don’t need (or want) it to stretch. If you are ever making a t-shirt style that stretches to pull over the head DO NOT TAPE the neck!)
Make all the darts.

Measure a piece of stay tape against your pattern by laying on the shoulder line, including the seam allowances. Pin the shoulders with RST and place the tape in place on the stitch line and stitch the shoulders together through the stay tape. Press the shoulder seam open.
Close the side seams and underarm sleeve seams. Neaten together.
Set in the sleeves.

Stitch CB collar seam, do not neaten. Press seam open.
Fold collar in half with WS together, so raw neck edges are aligned and the seam allowance is enclosed inside the collar.

With RST pin collar onto the body, align collar and body notches and CB collar seam with CB neck.

Stitch together with a 6mm S/A, neaten and press S/A towards the body.

Ready to wear t-shirts and sweatshirts often have a row of stitching at the neckline to hold the seam allowance flat. You can twin needle or edgestitch the neckline to mimic this if you wish. Confession: Proceed with caution, I broke my only twin needle when I hit the CB seam, so I continued with an edgestitch. Both look good!
The pattern has a 3cm hem allowance, press to the WS.
Twin needle the hem (I overlocked the raw edge first), again follow your machine guideline and test. My machine and a twin needle meant not using the walking foot and sewing at a slower speed.

As I made a top it was too short for pockets. Side pockets in jersey generally ring alarm bells for me. It’s perfectly possible to do the pockets but also possible the weight of the jersey bag will be lumpy or droopy under the dress or the pocket mouth will stretch and not sit flat. The final result is really going to depend on your fabric and your sewing skills.
If you made a dress version and want to add pockets, I did a test sample. I’ve followed the basic instructions for the FDS pocket but overlocked the side seam together rather than open. *I also didn’t fuse the pocket mouth, unlike the woven version, just to see what would happen really. It was OK but this Ponte is very stable, although next time I would put a small spot of interfacing at each pivot point for extra reinforcement. Again test your fabric to see what works for your jersey, and remember to use the knitted kind of interfacing.
*If in doubt just interface the pocket as the instructions and you could always add an extra strip for the back pocket mouth if you think your fabric needs it.

Overall I’m rather pleased with sewing The French Dart Shift in jersey. The collar is lovely in knitted fabric and it makes a very cosy and comfortable little top now that Autumn is upon us!


I had a Facebook message from a very lovely lady called Elfi from Germany, asking if I had ever made the French Dart Shift in Jersey.
No, I replied, I’d thought about it, but wasn’t sure about the darts. In actual fact I had bought a gorgeous Olive striped cotton jersey with that very intention last November and then made something else because of my stripe/jersey/dart dilemma.
I’m regretting that now – Elfi’s has turned out so beautifully!!!

The collar looks great in jersey, but if you’re intending to try this at home, remember to cut it on the straight grain rather than on the bias. The straight grain follows the same direction as the body, so cut your collar out with the shortest length running parallel with the selvedge of your cloth. If you look at Elfi’s you can see the pattern on the collar and body all runs in the same direction. The neck will still need taping of course, to prevent it stretching out of shape. Depending on the fit you want, you may also need to skim in the body a little to make use of the stretch. I’m thinking of making a short version (hip length) to wear more as a semi-fitted sweatshirt sort of feel, with a comfort/cosy factor, rather than a very fitted t-shirt look. But you know the rules, ladies..TOILE FIRST!!!!
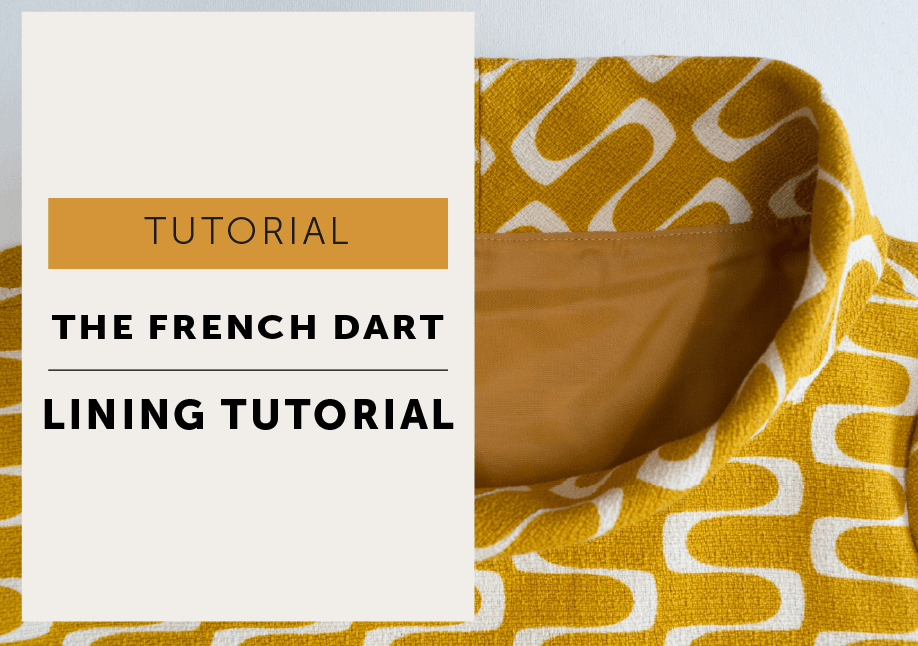
How do you add a lining to a dress or garment so it looks clean on the inside as well as the outside? Adding a lining is a simple but transformative step in garment making, giving your pieces a more professional finish, improving comfort, and helping certain fabrics drape and wear better. In this tutorial, we walk you through how to draft and sew a lining so it fits neatly within your garment, with all the key construction steps clearly explained.

I wasn’t planning to do a lining tutorial at all, but happily finding 2 metres of the perfectly coloured gold lining in my stash to match this beautiful Barkcloth, set me off on a path….and I thought it might be useful! So, let’s add a lining to The French dart pattern.
SUPPLIES
You will need The French Dart Shift Pattern (or similar style dress pattern) and the fabric and haberdashery listed plus
STEP 1 – PATTERN
Firstly, you need to make a lining pattern. Yep, really you do. You could cheat and just cut the body of the dress in the lining but as lining fabric doesn’t ‘give’ and you may well find that it all gets a little tight across the back. Sometimes you can add a pleat at the back (like inside a jacket, go on take a quick look at one, I’ll wait) but ideally, you don’t want any extra bulk at the back of a dress, just a little extra ease for movement.
So here’s what you do…The finished lining pattern will be WIDER and SHORTER than the main body pattern, and the sleeve is going to stay unlined, so no sleeve lining pattern needed!

Trace off the front and back body pattern, marking all the notches and darts. Extend the shoulder seam by 3mm and mark with a cross.
Next, mark a point half way down the armhole and 5mm OUT from the pattern and again 5mm OUT at the underarm.
Draw a GRADE LINE on the lining pattern 5mm away and parallel to the Centre Front Line (CF).

Redraw the armhole: using your original pattern piece as a template to join the points you just marked together.
The side seam needs to move OUT 5mm as well: Take the main pattern and lay on top of the lining pattern. Line up at the underarm (U/A), remember to use the new U/A point on the lining pattern, and the CF with the GRADE LINE (keep the patterns parallel with each other) and re-draw the side seam and bust dart.

Make the lining pattern 3cm shorter (which is the hem allowance of the dress) than the main pattern. The lining pattern will have a 1.5cm hem allowance so it will finish 1.5cm higher than the dress hem because you don’t want your lining on display when you strut your stuff!
Check your lining patterns against your originals…line them up at the C/F’s and C/B’s, are the lining patterns wider and shorter?
Do the front and back lining patterns fit together at the side seam? Yes? Good! Label them as your lining pattern, the size, and to cut them on the fold.
Now cut them out in lining.
STEP 2 – SEW
Make the body of your dress as described in your Maker Instructions. (Tape the neckline, make front and back darts, shoulders, pockets and side seams and hem.)
Make and hem the sleeves and put them to one side.

MAKE THE COLLAR
close the centre back (CB) seam and press open, fold collar in half and pin so raw edges are together. Be sure to line up all notches so the collar is not twisted.
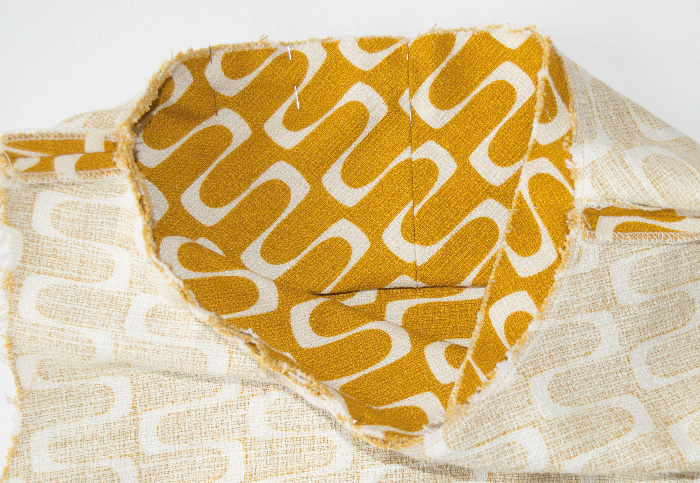
With right sides together (RST) pin the folded collar into the neckline of the dress, align notches to prevent the collar from twisting. Tack in 6mm seam allowance (S/A) to hold
MAKE THE LINING
Stitch and neaten bust darts, make back darts, close and overlock side seams together. Close shoulder seams and overlock open.

Double turn hem lining: Press up the hem 1.5cm, and then fold up the hem again so raw edge meets your pressed line, and press in a second line. Re-fold the hem along the pressed lines so the raw edge is enclosed and top stitch the hem.

ATTACH LINING AT NECKLINE
With RST, place the lining body inside the main body, align notches and pin. The collar is now sandwiched between the body and lining. Stitch the neckline with a 6mm S/A. Press neckline, with the S/A down and pressed AWAY from the collar. Understitch the lining around the neckline.
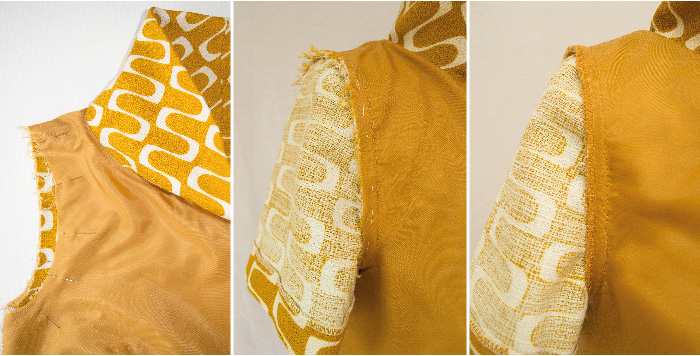
Pin armhole of body and lining together, aligning all the notches. Tack to hold.
Follow the Maker Instructions and set in the sleeves.
Overlock armhole together to neaten, treating all layers (sleeve/body/lining) as one. Give it a press.
That’s it, you’re done…wear and enjoy!


