Posted on 4 Comments

How to Make a Button Loop Tutorial

A handy little tutorial to show you how to make a handworked button loop…..

| HOW TO MAKE A BUTTON LOOP |

BUTTON LOOP TUTORIAL _MAVEN PATTERNS

| SUPPLIES to make a button loop |

Firstly gather your supplies:

garment (obviously)

button (1.5-1cm in width works well for a back neck opening), scissors, needle, beeswax (optional)

Thread: you have to make a decision here; help is at the end of the tutorial!

  • embroidery floss – great colours but makes a bulkier button loop,
  • ordinary sewing thread, will match your garment, good for garments made from delicate fabrics such as lawn. Run it through some beeswax to help strengthen it first.
  • topstitching thread – my preference, good colour selection and strong.

| METHOD |

BUTTON LOOP TUTORIAL _MAVEN PATTERNSTake a length of thread. I’m using topstitching thread and have threaded my needle with it doubled so I’m making 2 loops with one stitch (because I’m lazy and it’s quicker). I’m working on the WRONG SIDE of the garment and starting my loop back a few millimetres back from the edge. Bring your needle out at the point you want your loop to start.

Put your needle back into the garment where you want your loop to end, and bring it back out at the start point to form your loop.BUTTON LOOP TUTORIAL _MAVEN PATTERNS

Make your loop big enough to go over your button. It can be a little bit trial and error to get the loop the right size – it’s wise to check now that it fits!

| Top tip | use your finger or a pen as a guide for consistency.

Decide how many strands you need in your loop and repeat. I’ve done 8 strands. (There is a little guide at the end) Fasten your thread off securely. BUTTON LOOP TUTORIAL _MAVEN PATTERNSWith a new length of thread, bring your needle out at the base of the loop on the left. Work from the left towards the right and cover the loop with a standard blanket stitch: just put your needle through the button loop and keep your thread BEHIND your needle BUTTON LOOP TUTORIAL _MAVEN PATTERNSand pull the thread firmly. Slide the stitch along the loop so it sits to the left, right at the beginning next to the fabric.BUTTON LOOP TUTORIAL _MAVEN PATTERNS

Repeat, sliding each stitch snugly to the next, until the whole loop is covered with a closely worked blanket stitch. Secure your thread and stitch on your button.

| THREAD OPTIONS |

BUTTON LOOP TUTORIAL _MAVEN PATTERNSThese are a few of your options regarding which thread / how many strands per button loop. There isn’t a right and wrong answer for which one to use – depends on what you’re making and what you have available!

My preference is the first one using topstitching thread / 8 strands. I actually thought it was going to be too bulky and setting back a little to the wrong side of the garment helps hide messy starts and finishes. It made a really nice sturdy loop and I do like a little bit of contrast thread, so matching thread isn’t an issue for me.

The second loop is again using topstitching thread but with only 4 strands for the loop, it’s a little floppy but perfectly serviceable. This one I set right on the folded edge of the cloth.

Number 3 is Embroidery Floss / 3 strands. Lots of choice for colours with embroidery floss but is a little bulkier in appearance. Might be nice on knitwear.(I can’t knit, so I’ve never tried that). You could also split the threads and work with fewer strands rather than the usual 8 that the floss is made of.

Number 4 is the most delicate of the button loops. Made from my usual sewing thread pulled through beeswax to strengthen. With 8 strands for the loop and the blanket stitch worked with a double thread for 2 strand coverage. This one would be lovely to use on a delicate fabric such as a cotton lawn.

I do actually really like the last one because I got to finally use my neon pink sewing thread that I bought for no other reason than the colour!

Happy Sewing! x


Posted on

Block Fuse and Spot Fuse Tutorial

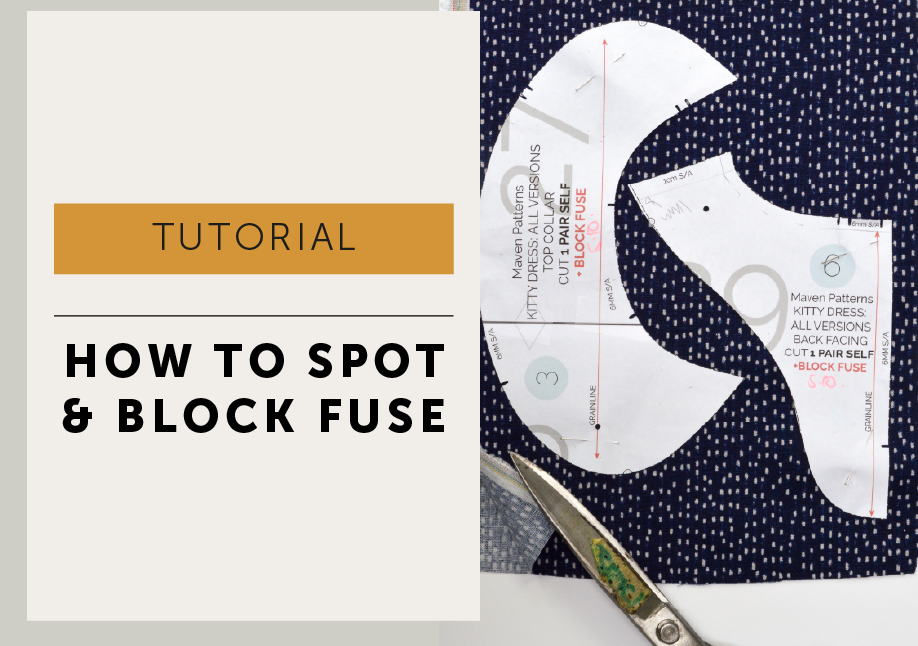
Block fusing your facings is a great little industry trick that anyone can use.

Why? It is more accurate to cut out facings from a pre-fused piece of fabric, rather than cutting the fabric and interfacing separately and then trying to fuse them together. They don’t always stay on the straight grain, they may shrink and it’s just so fiddly!

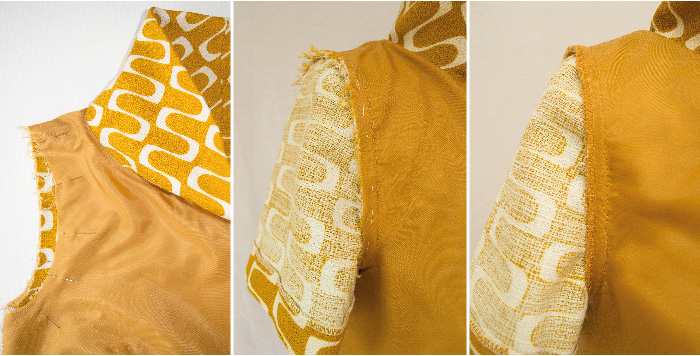
When? On facings, collars, pocket flaps, on any pattern piece that requires the WHOLE area to be interfaced. Maven Patterns are marked as CUT 1 PAIR SELF + BLOCK FUSE,  but other sewing patterns may be marked ‘cut 1 pair fabric + cut 1 pair interfacing’. This is an especially fabulous method to use for hideously slippy fabrics!

METHOD

BLOCK FUSING TUTORIAL_MAVEN PATTERNS

It’s really very simple. When laying up your garment to cut out, leave an extra couple of centimetres around your pattern pieces (a bit of wiggle room and enough in case of shrinkage when fusing) and roughly cut out the fabric. Ideally, make sure you use a piece with the selvedge on, so you can keep everything on grain.

BLOCK FUSING TUTORIAL_MAVEN PATTERNS

Should you be cutting a front facing on the fold; cut out roughly again and snip with your scissors along the folded edge. You’ll have a marker to re-fold on the grain after fusing. I find marking with chalk etc tends to disappear under the iron.

BLOCK FUSING TUTORIAL_MAVEN PATTERNS

Do a test piece first, don’t burn your fabric!

Cut a piece of interfacing very slightly smaller than your fabric, so it doesn’t overhang your edges and stick to your ironing board cover. Placing a cloth over your ironing board first is a good idea too. It saves the cover from gluey gunk which can transfer on to other garments – this is that voice of experience you hear of.

Lay the interfacing with the GLUE SIDE to the WRONG SIDE of the fabric. Cover with a cloth and PRESS into place. Refer to the manufactures instructions but heat, steam and pressure are usually the best combo. Don’t be tempted to drag your iron over it either, it will stretch and shift. Just place and press with your iron. I usually allow it to cool before turning over and pressing on the right side too. You can do quite large pieces if necessary, but it is a lot easier to manage if you use smaller pieces and you are less likely to get creases and bubbles in the interfacing.

BLOCK FUSING TUTORIAL_MAVEN PATTERNS

Now just cut out your facings and collars.

HOW TO SPOT FUSE

BLOCK FUSING TUTORIAL_MAVEN PATTERNS

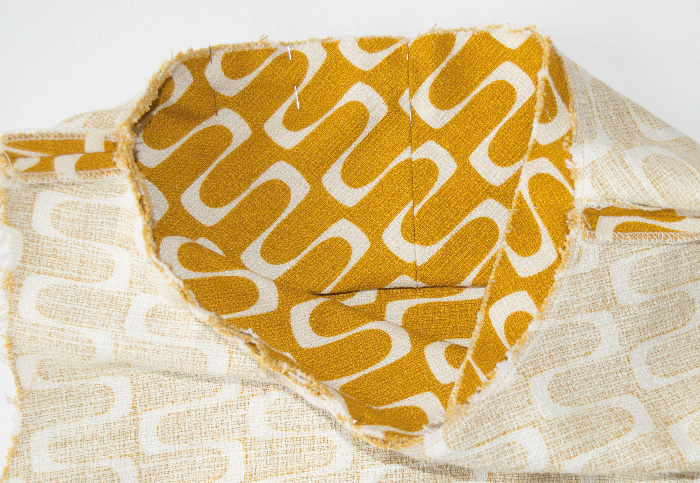
When and why? If BLOCK FUSING is used to interface an entire piece, how do you strengthen one small area of a garment? That’s when you SPOT FUSE.You might, for example, want to add a patch pocket on a jersey t-shirt. You know that each top corner is going to be a really weak point and wear badly after a few washes. Spot fusing means you can add a small piece of interfacing for extra stability but only where it’s needed. The pocket mouth on The French Dart Shift and the Kitty Dress, and the neck opening on The Wendy Smock all need a little extra reinforcement with fusible interfacing. We don’t need it all over the garment- just in a specific SPOT .

Method

So easy! Cut your pattern piece out in fusible interfacing only as directed (marked on Maven Patterns as CUT 1 PAIR FUSIBLE INTERFACING). Apply directly to the area of your garment that needs extra support. That’s it! 

*a little note…

I’ve called this SPOT FUSING for the last 30 odd years while working in the industry. But, just to confuse you, sometimes the term ‘spot fuse’ is also used to describe attaching fusible interfacing to the fabric when you block fuse a LARGE area. Interfacing is difficult to attach over a large area without it twisting, bubbling or other such delights. Lifting your iron and placing the tip down in various places working from the centre outwards is a good method, basically, gently STEAM BASTING the interfacing into place rather than the attempting to do the whole piece in one go.

Posted on

Pattern Magic – an experiment

MAVEN PATTERNS_PATTERN MAGIC


“Garments we design ourselves appeal to the emotions as well as the eye.

Unexpected shapes and forms can be converted into flat patterns and ultimately into garments. From this new ideas develop, making the process a rewarding one.

I want to copy forms and details that I create unexpectedly onto a flat surface to understand their structure as a pattern.

Patterns are like documents that describe a garment, conveying its structure more eloquently than words. They can even convey the thoughts of its creator.”

TOMOKO NAKAMICHI

Author and creator of Pattern Magic | Professor at Bunka Fashion College

Inspiring and thoughtful words.

The following samples are the result of a workshop in 3D pattern cutting that I attended a while back, and taken from the cult Japanese book Pattern Magic 2.

I’ve had the Pattern Magic books for a few years, and looked but had not really given them the time they deserve. These shapes have played on my mind for the last few weeks, a pattern cutters mind is always trying to find a parallel between creativity and practicality. I’m curious now as to how this little experiment will inform future designs. I’ve found, over the years, patience is usually the key for me. Ideas tend to fight their way to the top and escape when they’re ready and when I’ve made a little space for them.

In the mean time I’m happy with these little toiles and the time taken to play.

MAVEN PATTERNS_PATTERN MAGIC

NYOKITTO | at the front

MAVEN PATTERNS_PATTERN MAGIC

NYOKITTO | at the front

MAVEN PATTERNS_PATTERN MAGIC

NYOKITTO | at the back

further links:

Pattern Magic Community

Pattern Magic: the books 

Posted on 3 Comments

#MAVENMAKERS – a jersey surprise!

#MAVENPATTERNS_jersey surprise-36

#MAVENMAKERS – A Jersey Surprise!

I had a Facebook message from a very lovely lady called Elfi from Germany, asking if I had ever made the French Dart Shift in Jersey.

No, I replied, I’d thought about it, but wasn’t sure about the darts. In actual fact I had bought a gorgeous Olive striped cotton jersey with that very intention last November and then made something else because of my stripe/jersey/dart dilemma.

I’m regretting that now – Elfi’s has turned out so beautifully!!!

#MAVENMAKERS_MAVEN PATTERNS

The collar looks great in jersey, but if you’re intending to try this at home, remember to cut it on the straight grain rather than on the bias. The straight grain follows the same direction as the body, so cut your collar out with the shortest length running parallel with the selvedge of your cloth. If you look at Elfi’s you can see the pattern on the collar and body all runs in the same direction. The neck will still need taping of course, to prevent it stretching out of shape. Depending on the fit you want, you may also need to skim in the body a little to make use of the stretch. I’m thinking of making a short version (hip length) to wear more as a semi-fitted sweatshirt sort of feel, with a comfort/cosy factor, rather than a very fitted t-shirt look. But you know the rules, ladies..TOILE FIRST!!!!

UPDATE: If you love the jersey used for this dress, I have some good news…..Elfi has a fabric shop! It’s full of lovely, lovely prints! 

The  BIGGEST of thank you’s to Elfi for sharing her very inspiring French Dart Shift